Loading...

Azure Quick Links

Azure Cloud Projects

Azure Data Factory & Synapse Pipeline

Advanced Azure Data Pipeline with Synapse Analytics.

Task Details

In this project, we will use Azure Data Lake Storage Gen2, SQL Server, and Azure Data Factory with managed identity, along with Synapse Serverless SQL, to securely store, process, and query data while enabling automated ETL and analytics workflows.

1. Create Azure Data Lake Storage Gen2 – Set up a central repository to store structured and unstructured data, forming the foundation of your data lake.

2. Create SQL Server and Database – Establish a relational data store to hold processed or curated data for structured queries and reporting.

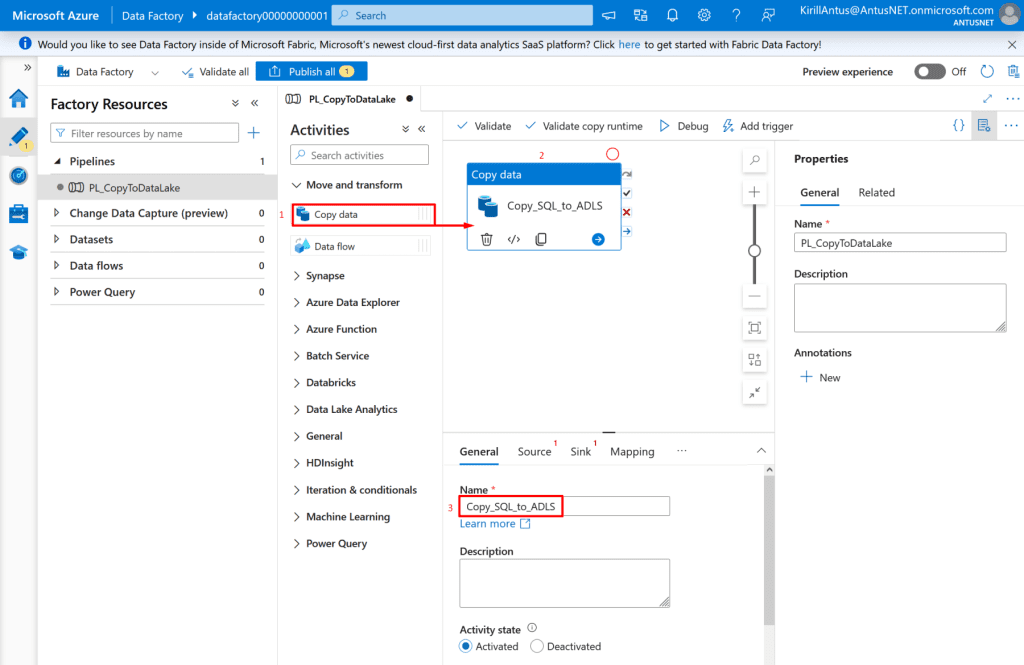
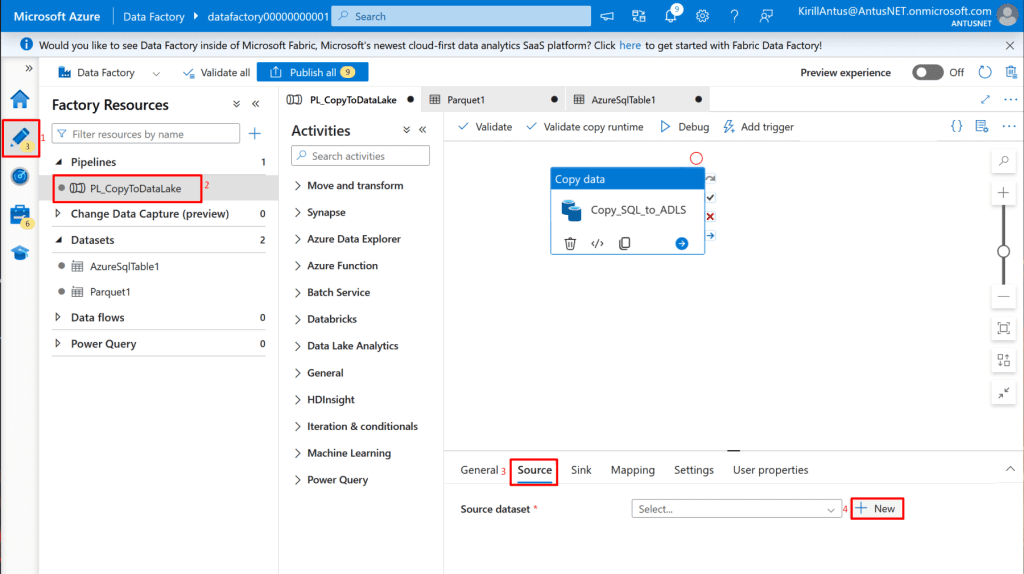
3. Set up Azure Data Factory (ADF) – Implement an ETL/ELT orchestration service to move and transform data between systems automatically.

4. Enable System-Assigned Managed Identity on ADF – Configure secure, passwordless authentication for ADF to access other Azure resources.

5. Grant Permissions to ADF Managed Identity in Data Lake – Apply least-privilege access control so ADF can interact with the Data Lake securely.

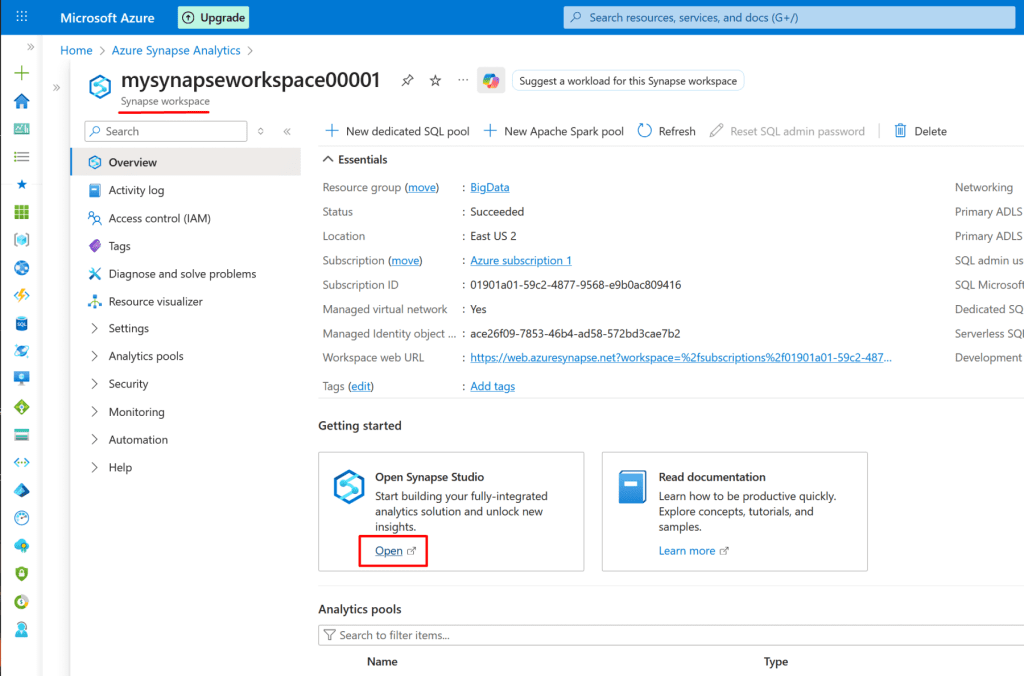
6. Create Synapse Workspace with Serverless SQL Pool.

7. Query Data with Synapse SQL Serverless – Run serverless SQL queries on your data for analysis and reporting

*

Steps

Create Azure Data Lake Storage Gen2

1. Sign in to the Azure portal → Create a resource → Storage account.

2. Select StorageV2 (general-purpose v2).

In the Basic tab, fill out the following:

*

4. In Advanced tab

  • Enable Hierarchical namespace (required for Data Lake Gen2).

Note: Use one container for all raw files to reduce management and costs.

*

5. In Networking tab

  • Create virtual network name: Vnet01
  • Create new subnet name: DataLakeSubnet

Note: In this project, I will allow public network access to the storage account for demonstration purposes. In a real-world scenario, this should be disabled to ensure proper security.

*

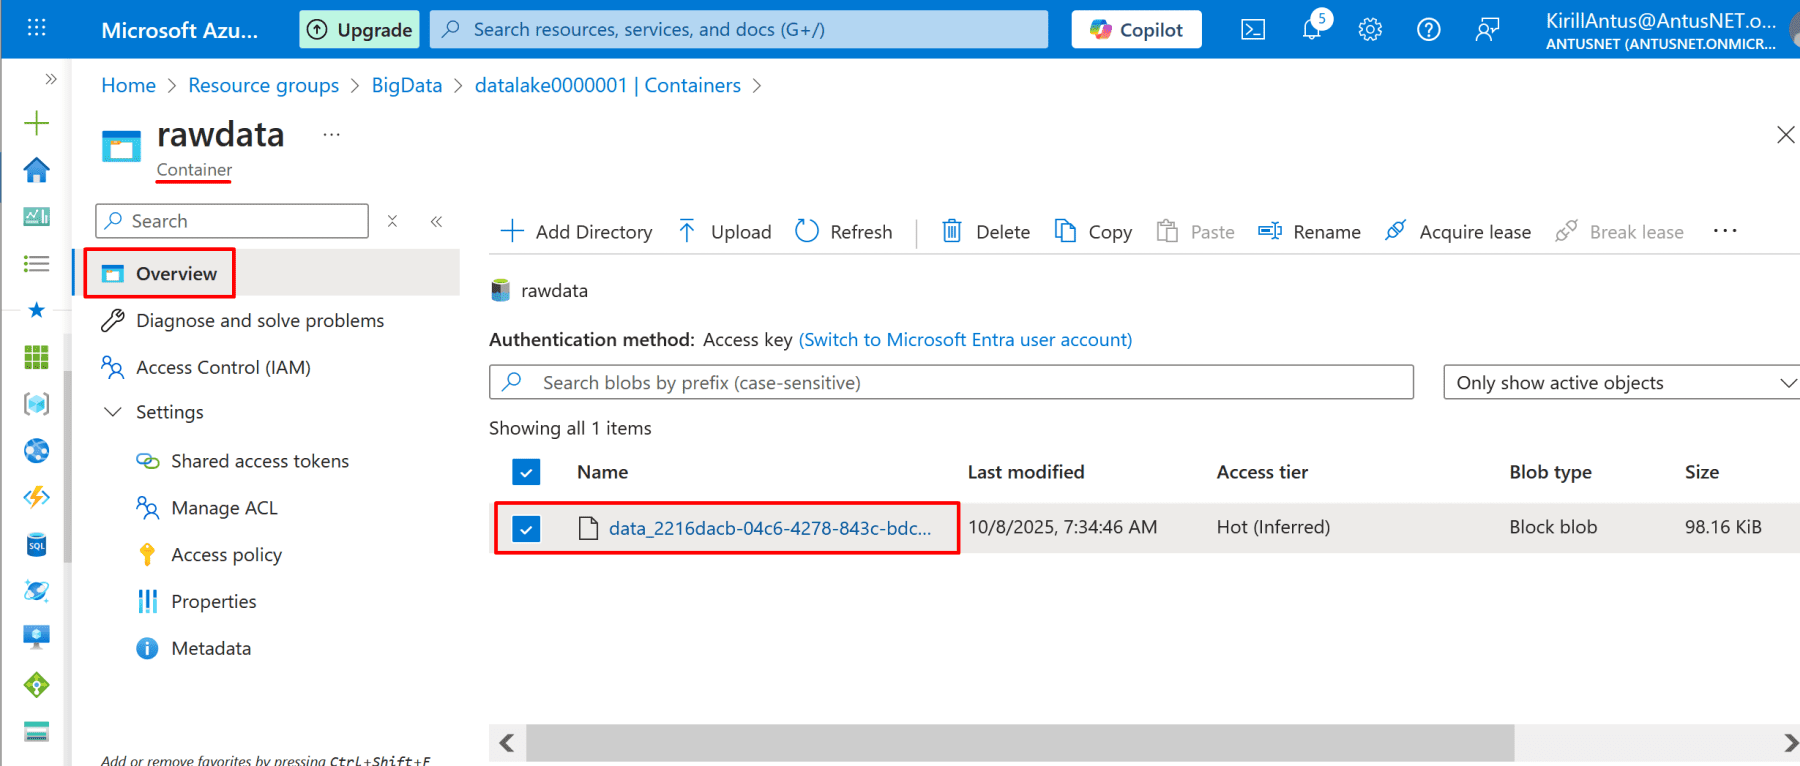
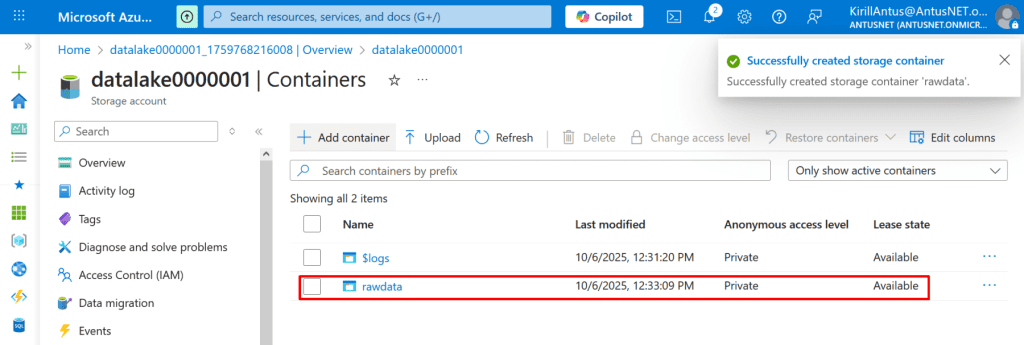
6. Once created, go to Containers → + Container → name it rawdata.

Note: Use one container for all raw files to reduce management and costs.

*

Create SQL Server and database

1. Please refer to the project Securing Azure SQL Database for detailed steps on setting up an Azure SQL Database and its associated server.

Note: In this example, we will use the pre-generated Sample database

Note: You will have to enable managed identity on SQL Server.

*

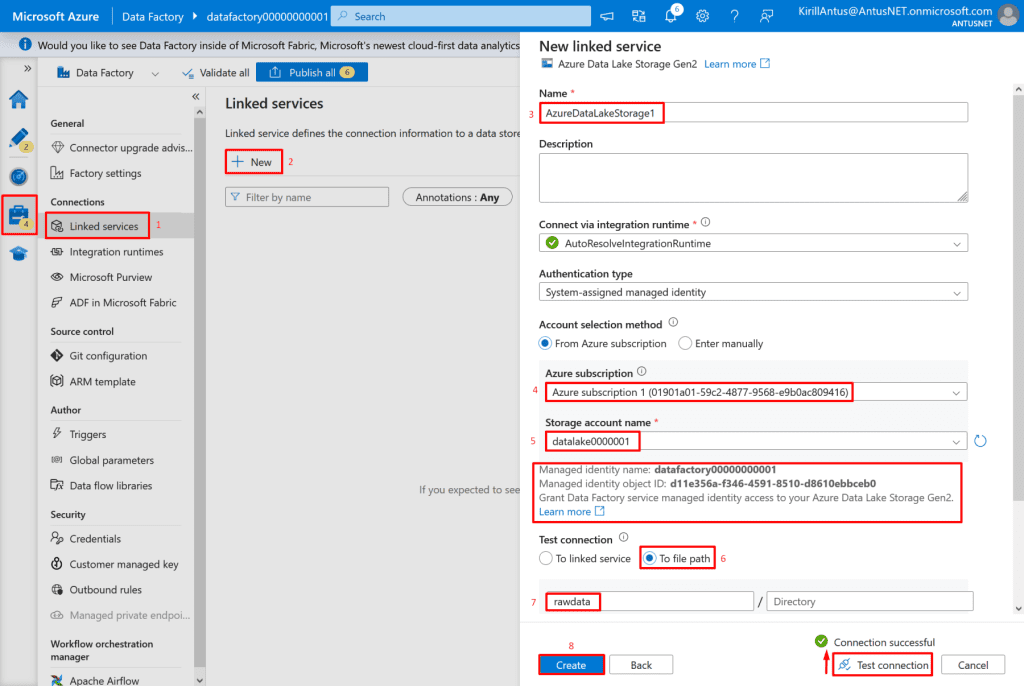
Create Azure Data Factory (ADF)

The purpose of Azure Data Factory (ADF) in this project is to act as the data movement and transformation engine,  it automates how data flows between services like Data Lake Storage (ADLS Gen2) and SQL Database, and prepares it for Synapse Analytics to analyze.

1. Go to Create a resource → Data Factory → fill in name, region, and resource group then click Review+Create

*

Enable a system-assigned managed identity on Azure Data Factory

1. Go to your Data Factory in the Azure portal.

  • In the left menu, select Managed Identities (under settings) → System assigned → Status: On → Save.

This will create a managed identity for your Data Factory.

*

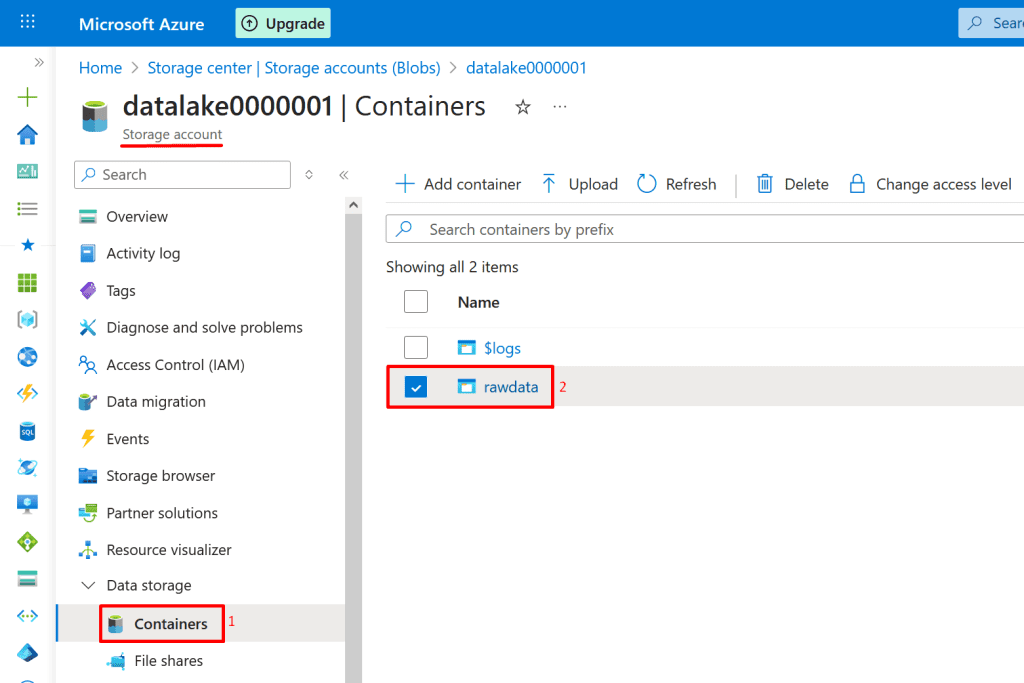
Grant the Data Factory managed identity permissions on the Data Lake Storage container ‘rawdata’

1. Go to your Storage Account → Data Lake Storage Gen2 container (rawdata).

*

2. Open Access Control (IAM) → click + Add role assignment.

*

3. Add Role: Storage Blob Data Contributor (allows read/write access).

*

4. Assign access to Data Factory’s managed identity → Select your Data Factory → Review + Assign.

Create linked services for your SQL Server database and Data Lake Storage in Azure Data Factory Studio. 

We create a Linked Service using a Managed Identity so that ADF can connect to and access external data sources securely and automatically during ETL/ELT workflows.

Note: In Azure Data Factory, linked services define the source and destination connections for data movement

1. Go to Data Factory → Overview → click Launch Studio.

*

2. Once in Data Factory Studio

  • On the left panel, click Manage.
  • Under Connections, click Linked Services → + New.

*

Create link for Data lake storage

3. In the New Linked Service window, search for Azure Data Lake Storage Gen2.

  • Select it and click Continue.

*

4. Add a Data Lake linked service to use as the sink (destination)

In the new linked service Fill in:

  • Name: AzureDataLakeStorage1
  • Authentication type: select Managed Identity
  • Storage account name: select your account
  • File system: enter rawdata
  • Click Test Connection → should succeed.
  • Click Create.

*

Create link for SQL database

5. Add a SQL Server linked service to use as the source

  • Click New
  • Search for Azure SQL database
  • click Continue

*

6. Fill in the parameters for the linked Data Lake service.

  • Name: AzureSqlDatabase1
  • Authentication type: select Managed Identity
  • Database name: db01
  • Server name: sql000000001
  • Click Test Connection → should succeed
  • Click Create

*

Create a pipeline in Azure Data Factory that ingests data into your rawdata container

We create the pipeline so that data flows automatically and securely into the Data Lake, ready for processing and analysis.

1. In Author → Pipeline → + New pipeline.

*

2. Rename it to something like PL_CopyToDataLake.

*

3. Add a Copy Data Activity.

  • In the Activities pane (right side), search for Copy Data.
  • Drag Copy Data into the pipeline canvas.
  • Select it → in the General tab, rename it to Copy_SQL_to_ADLS.

Note: We add a Copy Data activity to copy data from SQL Server into the Data Lake automatically.

*

Choose the Source

4. Choose the source from which the data will be copied.

  • Click the Source tab.
  • Click + New to create a Dataset for your data source:

*

  • Choose Azure SQL Database and continue

*

  • Enter name for source set: AzureSqlTable1
  • Linked service: AzureSqlDatabase1 (This is the link you created earlier.)
  • Choose table name to copy: SalesLT.Costumer
  • Click OK

*

5. Alternatively, you can choose the table to copy from this screen.

Note: this table is from "Sample database."

*

Choose the destination (sink)

1. Choose the sink (destination)

  • Click on Sink tab
  • Click New
  • Search for data lake
  • Choose Azure Data Lake Storage Gen2
  • Click Continue

*

2. Select the desired format for the data (Parquet in this case)

Note: Parquet is a file format commonly used in Azure Data Factory, Data Lake, Synapse, and Databricks.

3. Choose the data lake container "rawdata" created previously.

Note: This is where the data will be copied (destination = "sink")

*

4. Select "Flatten hierarchy" as the copy behavior.

Note: We choose “Flatten hierarchy” as the copy behavior to simplify the destination structure. This ensures all data files are written directly into the target folder (rawdata) without creating nested subfolders, making it easier to access and process the files downstream.

*

5. Click publish all.

Note: You should click “Publish all” after creating or editing a Linked Service (or any other resource) in Azure Data Factory Studio.

*

6. Add a Trigger:
Run the pipeline now or schedule it. In this example, we trigger it immediately to verify the table is copied to the rawdata container.

*

7. Go back to the Azure portal and check whether the data has been copied to the rawdata container.
Here, we can see that the data was copied successfully!

*

8. Schedule a Trigger:

  • Click Add trigger → New/Edit.

*

9. Choose New.

*

10. Give the trigger a name, select the required settings, and click OK.

Note: The trigger will copy the selected table to the rawdata container every 15 minutes.

Note: Avoid scheduling frequent triggers in testing to reduce costs. Run manually.

*

11. Click publish all to activate the trigger.

Create Synapse Workspace with Serverless SQL Pool

1. Click Create a resource → Analytics → Azure Synapse Analytics.

Basics tab:

  • Subscription & Resource Group: Select appropriate ones.
  • Workspace Name: e.g., mysynapseworkspace001
  • Region: Choose the region closest to your Data Lake for latency optimization.
  • Select Data Lake Storage Gen2 account name: choose your created earlier datalake account name.
  • Select Data Lake Storage Gen2 File system name : choose rawdata (created earlier)

*

2. In the Security tab:

  • Enable Managed Virtual Network if you need private connectivity.
  • Enable Data Lake Storage Gen2 account access (we’ll link it next).

*

3. Networking tab:

  • Choose Public endpoint or Private endpoint based on your security needs.
  • Review + Create → Click Create.
  • Once deployed, open the workspace and you’ll automatically have Serverless SQL Pool available (default name: Built-in).

Note: If you enable a Managed Virtual Network or your storage account is secure, you can create a managed private endpoint to your storage account. The storage account owner must approve the connection, unless the Synapse user creating an Apache Spark pool has enough privileges to approve it automatically.

*

Query Data with Synapse SQL Serverless

Use Synapse SQL Serverless to query and analyze data in the Data Lake.

1. Open Synapse Studio.

*

2. Click Open Synapse Studio → it launches in a new tab.

  • On the left panel, select Data → Linked → Azure Data Lake Storage Gen2 (confirm your storage account appears).

*

3. Select Develop → SQL scripts to open the query editor, then click publish all.

*

4. Configure Access to Data Lake.

Before querying, verify Synapse’s managed identity has access to your Data Lake container.

  • Go to your Data Lake Storage account → Container → rawdata  → Access Control (IAM).
  • Click Add role assignment.

*

5.  In Add Role Assignment Assign:

  • Role: Storage Blob Data Reader.
  • Principal: Synapse workspace managed identity.

*

6. Choose Synapse workspace and click Select then Review+ create the Review + Assign

This ensures Synapse Serverless can read files from your Data Lake containers.

*

7. In Synapse Studio, verify the connection to storage.

  • Go to Manage → Linked services.
  • Confirm your Data Lake connection uses Managed Identity.
  • Test the connection to ensure it’s successful.

*

8. Query Raw Data and Confirm that the first 100 rows of your table in rawdata container can be successfully read by running the SQL script in Synapse Serverless SQL Pool

  • Go to Develop → SQL script and run this SQL query:

Copy

-- Read Parquet files from Data Lake
SELECT *
FROM OPENROWSET(
    BULK 'https://datalake0000001.dfs.core.windows.net/rawdata/*.parquet',
    FORMAT='PARQUET'
) AS [SalesData];


Note: This confirms that the rawdata container was successfully read and that the data is accessible as a table in Synapse Serverless SQL

*

Conclusion

This project demonstrates how to build a secure and automated Azure data pipeline: from storing raw data in Data Lake Storage, processing it in SQL Server, and orchestrating workflows with Data Factory using managed identities to analyzing the data with Synapse SQL Serverless.

*

Written by Kirill.A - Azure & Cybersecurity Consultant at AntusNet

➤ Want more? Browse all our Azure implementation guides.

Need help implementing secure Azure solutions?

Contact us for a free consultation.

    error: Content is protected !!