Set Up Azure Container Registry and Push a Docker Image from a Virtual Machine to the Registry

Task Details
1. Create an Azure Container Registry
Set up a private container registry in Azure to store and manage your Docker images securely.
2. Create an Azure Linux Virtual Machine
Deploy a Linux-based VM in Azure, which will act as your Docker host for building and pushing images.
3. Install Docker on the Linux VM
Connect to the VM via SSH and install Docker to enable container image creation and management.
4. Push Docker Image to Azure Container Registry
Build your Docker image on the VM and push it to your Azure Container Registry using Docker CLI commands.
*
Steps
1. Create an Azure Container Registry

*
2. Name your Container Registry, leave the default settings, then click 'Review + Create' followed by 'Create'. Your Container Registry will be ready in a few minutes.

*
3. Click Go to Resource, then on the Overview page, note the value of the Login server for your Container Registry.

*
4. Create an Azure Linux Virtual Machine.

*
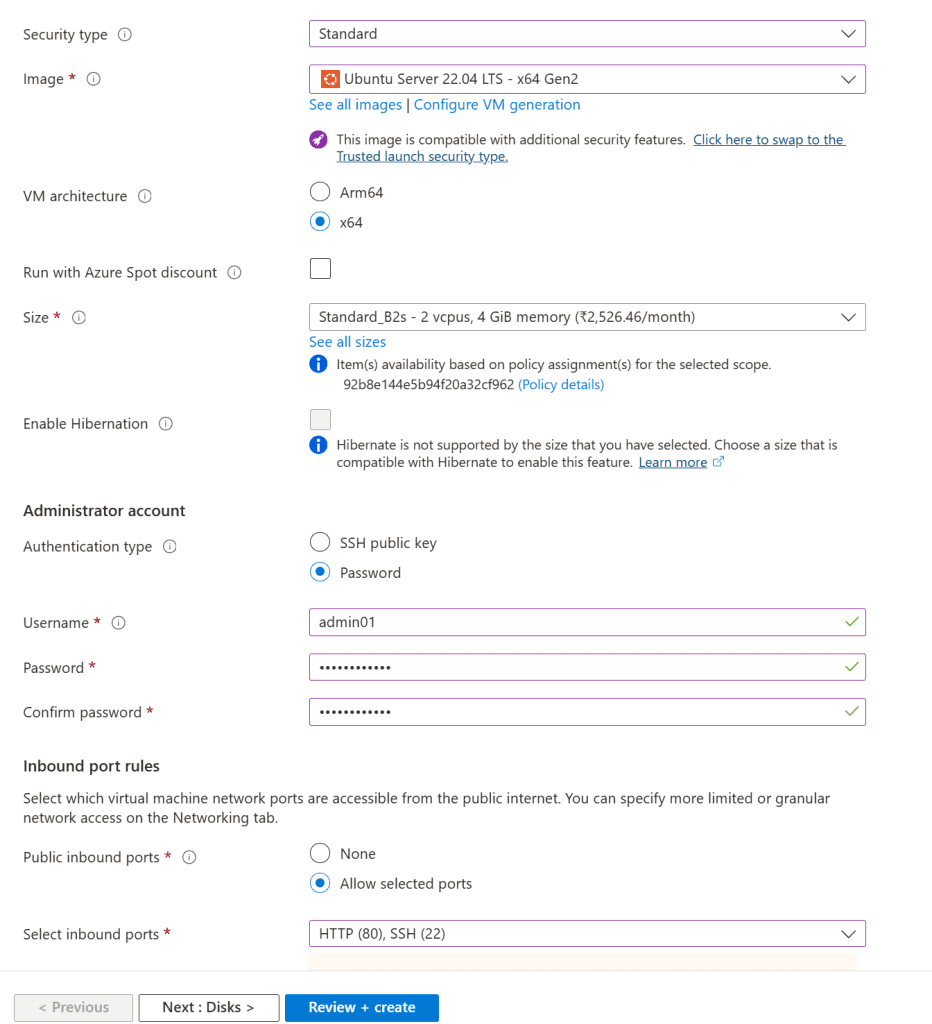
5. In the Virtual machines section, click + Create a virtual machine and enter the required values in the Basics tab.
Instance details:
- Virtual Machine Name: Enter vm1-docker-linux
- Region: Select East US
- Available Options: No infrastructure redundancy required
- Security: type: Standard
- Image: Select Ubuntu Server 20.04 LTS - x64 Gen2
- Azure Spot instance: Leave the default unchecked.
- Size: Standard_B2s
Administrator Account:
- Authentication type: Select Password
- Username: Enter a username
- Password: Enter a password
- Confirm password: Re-enter password
Inbound Port rules:
- Public inbound ports: Select Allow selected ports
- Select inbound ports: Select SSH (22), HTTP (80)

*
6. Click Next to proceed to the Disks tab and configure your desired disk settings.

*
7. Leave the default settings, click Review + Create, then Create. Your virtual machine will be deployed in a few minutes.

*
8. Install Docker on the Linux VM
Download PuTTY and use it to establish an SSH connection to your virtual machine.
Note: Download PuTTy from here: https://www.putty.org/
*
9. Go to your Linux VM in the Azure portal, copy its Public IP address, and paste it into PuTTY and click "Open" to start an SSH session with the Linux VM.

*
10. In the terminal, provide the username and password to log in to your Linux VM.

*
11. Update the package index by running the following command:
Copy Command: sudo apt-get update

*
12. Install the required packages to enable apt to use repositories over HTTPS by running:
Copy Command: sudo apt-get install apt-transport-https ca-certificates curl gnupg-agent software-properties-common

*
13. Add Docker’s official GPG key by running this command:
Copy Command: curl -fsSL https://download.docker.com/linux/ubuntu/gpg | sudo apt-key add -

*
14. Set up the stable Docker repository by running this command:
Copy Command: sudo add-apt-repository "deb [arch=amd64] https://download.docker.com/linux/ubuntu bionic stable"

*
15. Update the package index and install Docker by running these commands:
Copy Command: sudo apt-get update
Copy Command: sudo apt-get install docker-ce docker-ce-cli containerd.io

*
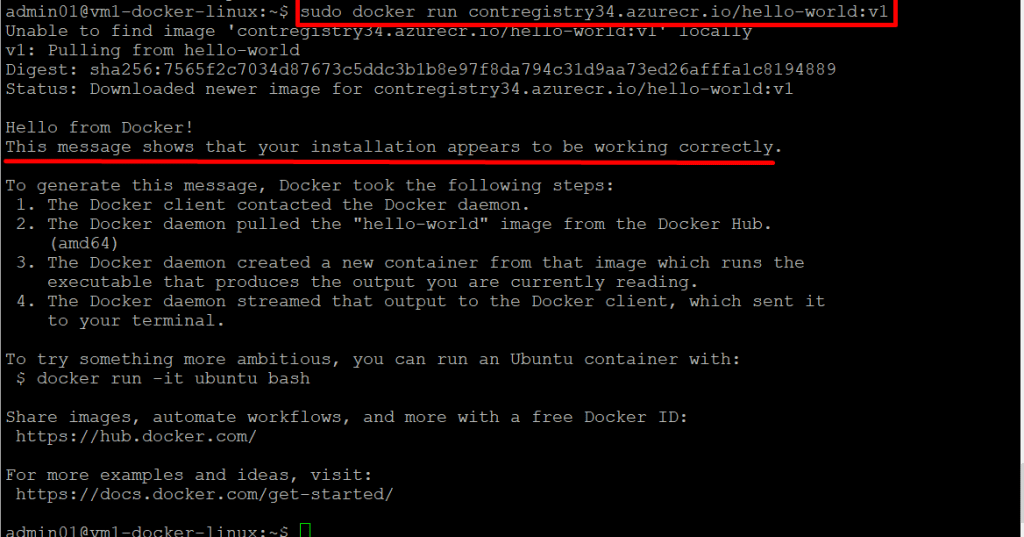
16. Push Docker Image to Azure Container Registry.
To push an image to Azure Container Registry, you first need a Docker image. If you don’t have a local image, you can pull a public image from Docker Hub to get started.
In the Azure portal, navigate to your Container Registry. Under the Settings section on the left, select Access keys. Check the Admin user box to reveal the username and password needed to authenticate with your registry.

*
17. Return to your Linux VM session and run the following command to log in to your container registry. When prompted, enter the username and password you obtained earlier. Be sure to replace loginServer with your container registry’s login server name:
Copy Command: sudo docker login