Loading...

Azure Quick Links

Azure Cloud Projects

Databricks Analytics

End-to-End Azure Data Analytics Pipeline with Databricks, ADLS, and Synapse Analytics.

Task Details

In this project, you’ll create a secure, automated Azure data pipeline that ingests raw data into Azure Data Lake Storage Gen2 (ADLS), transforms it using Azure Databricks, and analyzes it through Azure Synapse Analytics Serverless SQL.

1. Create a Resource Group.

2. Create Azure Data Lake Storage Gen2.

3. Create an Azure Databricks Workspace.

4. Create and Configure Databricks Cluster and notebook.

5. Create Azure SQL Server & Database.

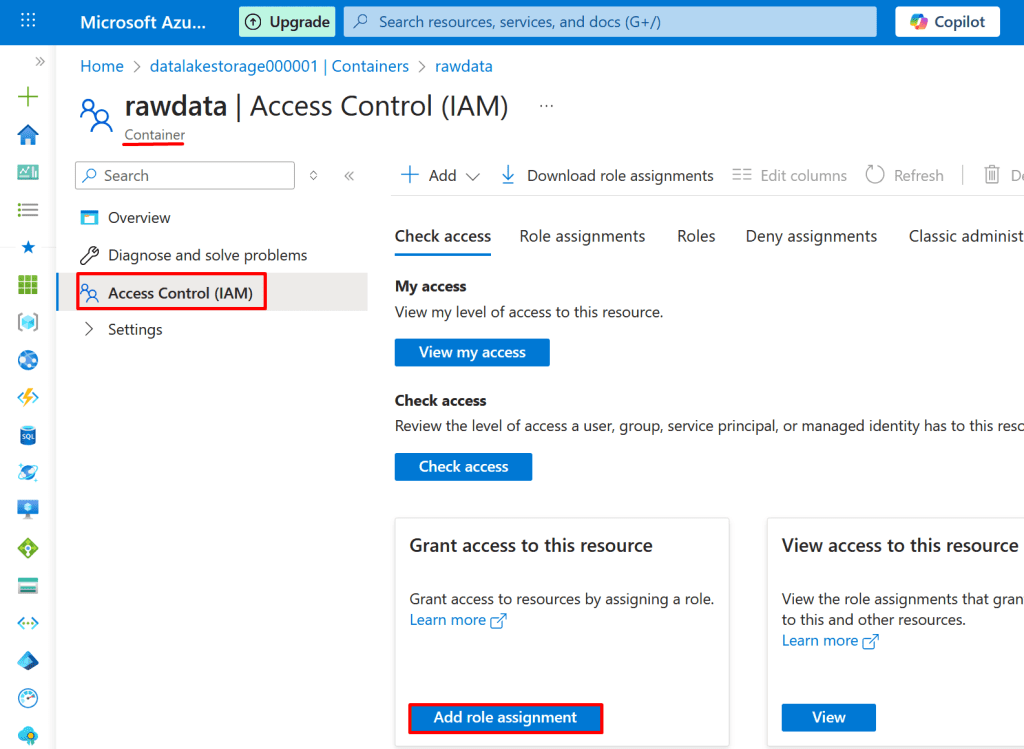
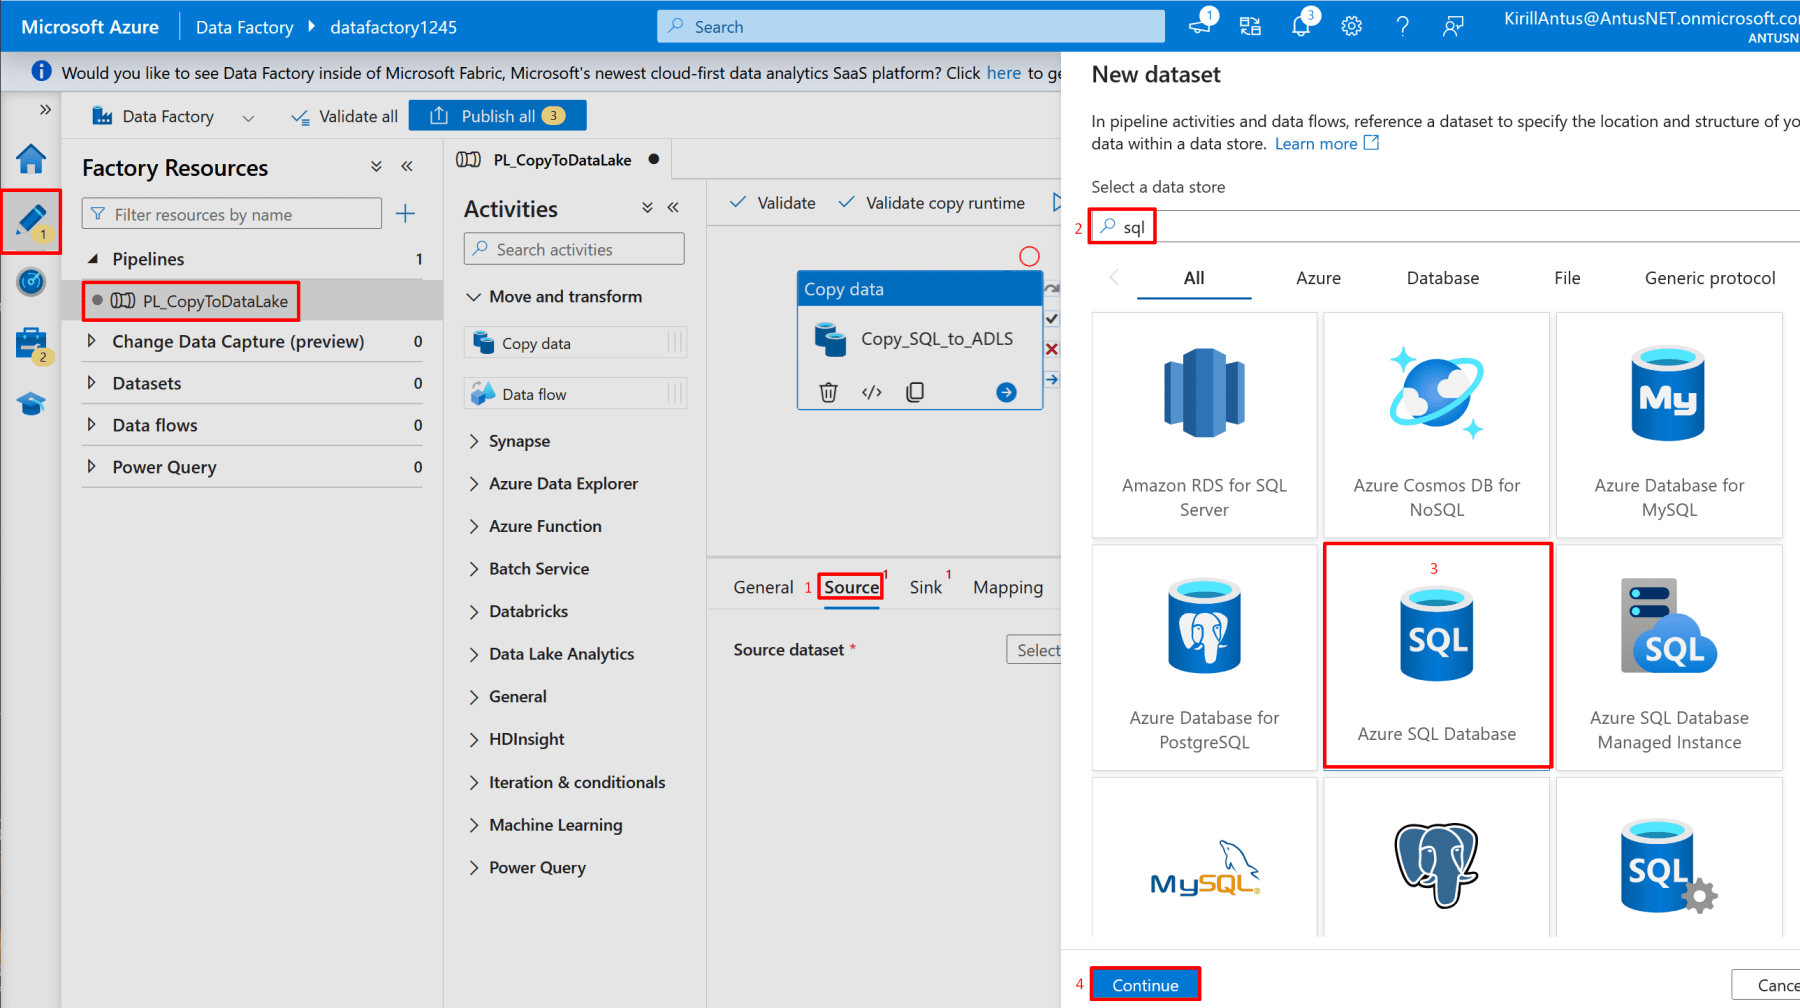
6. Create Azure Data Factory (ADF), configure its permissions, set up linked services, and perform data movement.

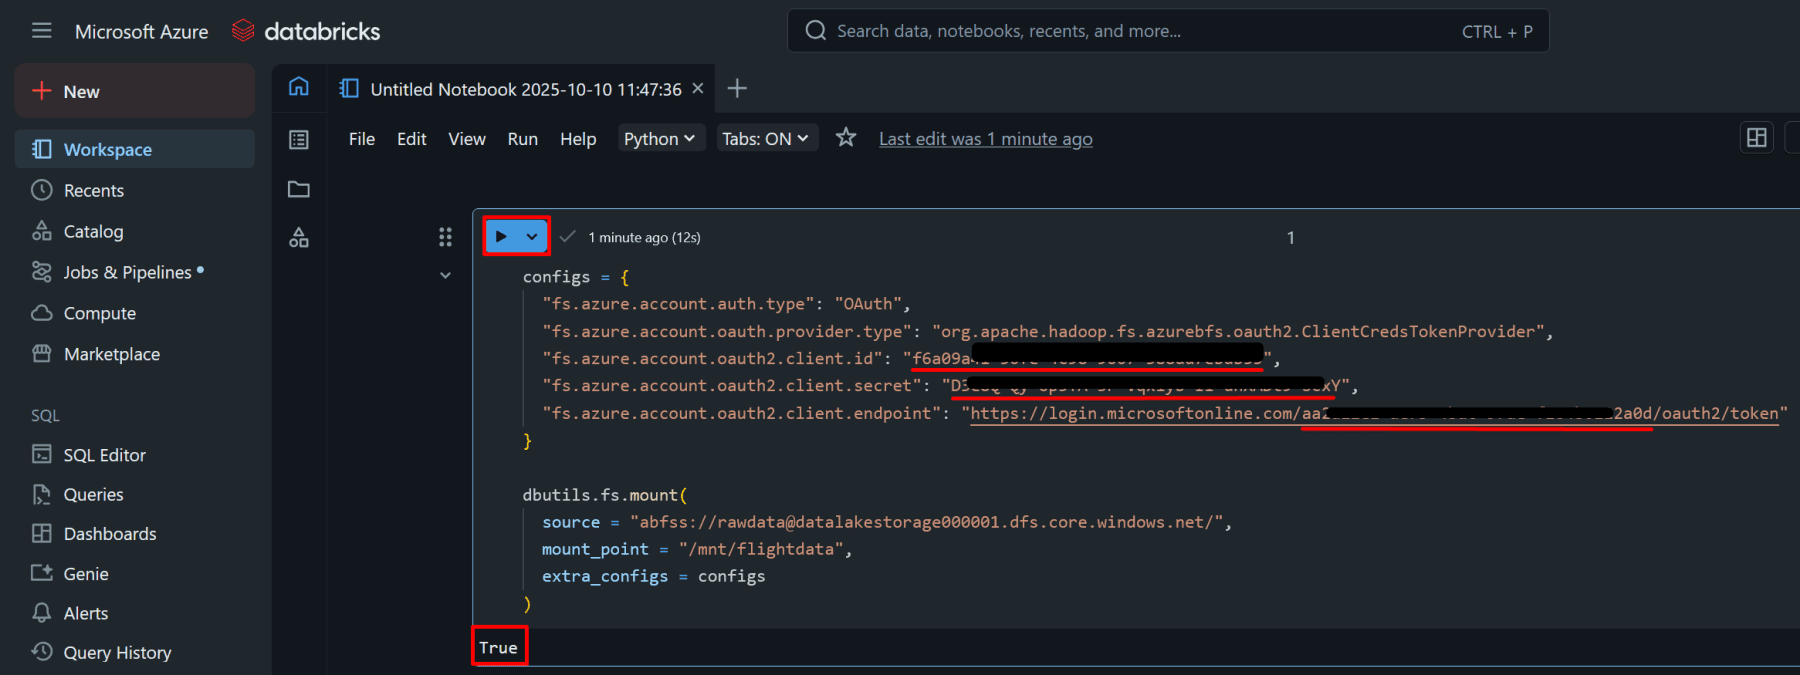
7. Configure Access for Databricks Using Client Credentials OAuth.

8. Transform Data in Databricks.

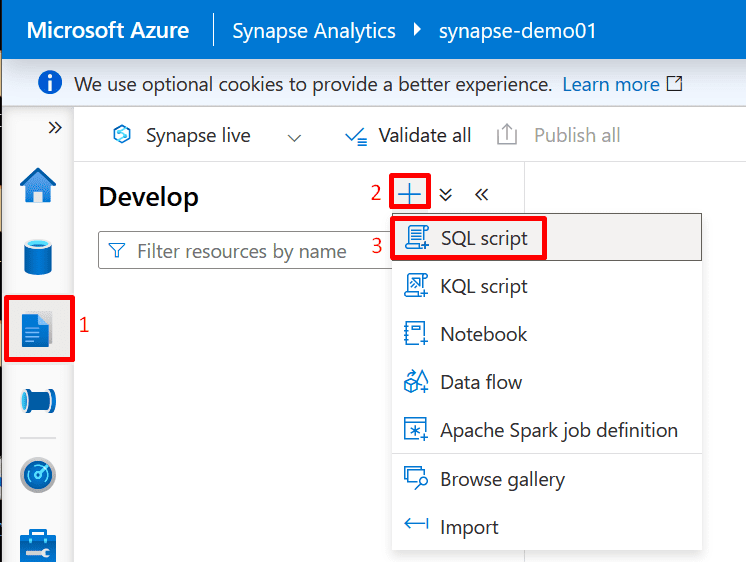
9. Create an Azure Synapse Analytics Workspace.

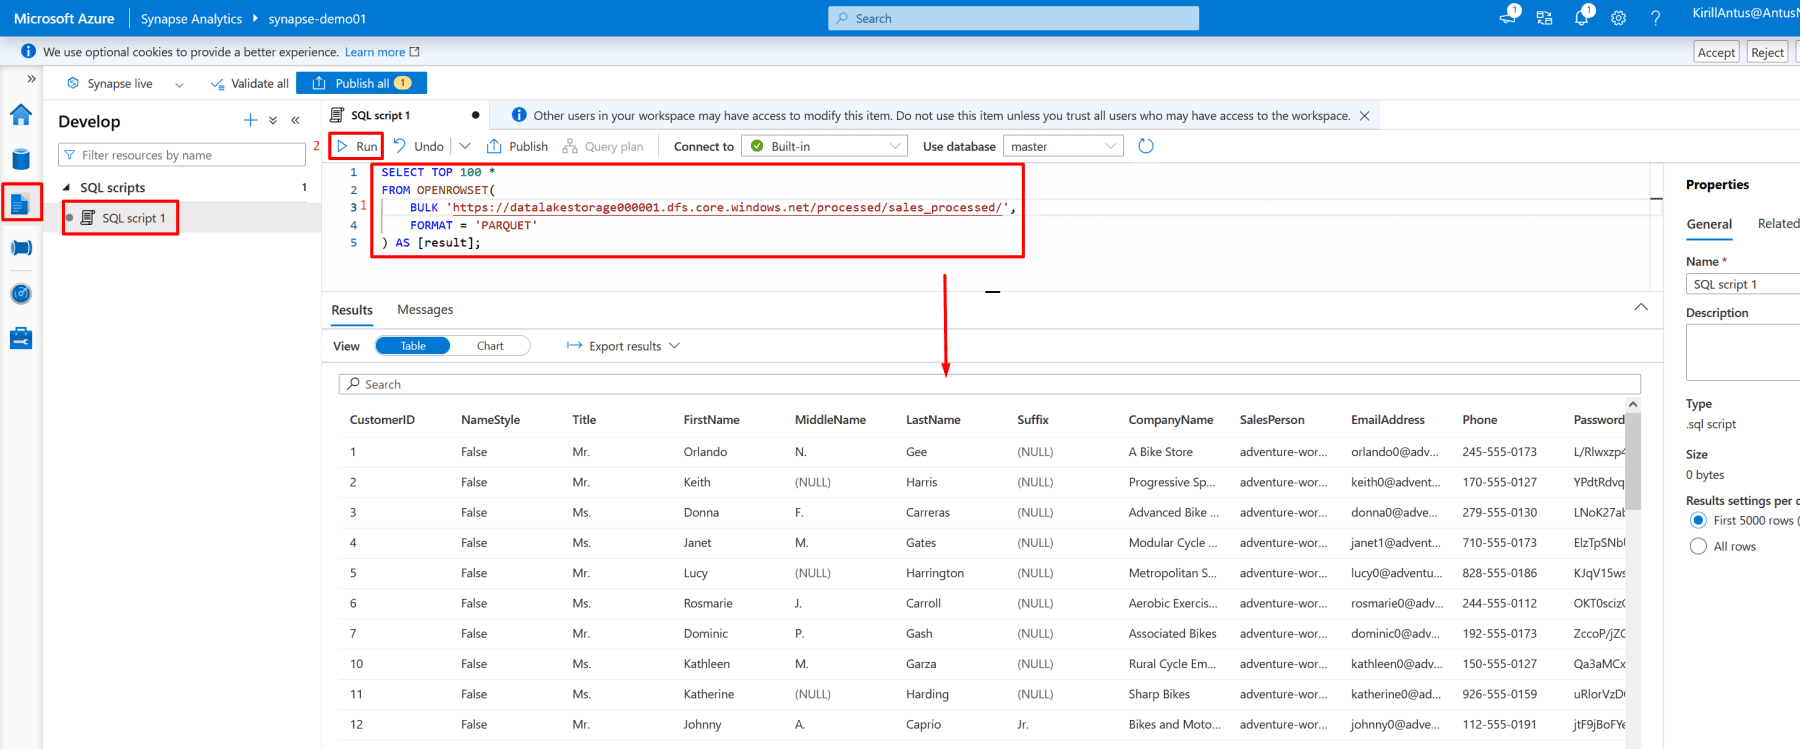
10. Query Processed Data in Synapse

*

Architecture Flow

Raw Data → Data Factory → ADLS → Databricks (Transform) → ADLS (Processed) → Synapse SQL (Query)

Steps

Create a Resource Group.

1. Go to the Azure Portal → Resource groups → Create.

2. Enter a name, e.g., DatabricksRG.

3. Choose a region (e.g., East US).

4. Click Review + Create → Create.

*

Create Azure Data Lake Storage Gen2.

1. Go to Storage Accounts → Create.

*

2. In the Basics tab enter:

  • Name: datalakestorage001
  • Region: same as the resource group
  • Performance: Standard
  • Redundancy: LRS

*

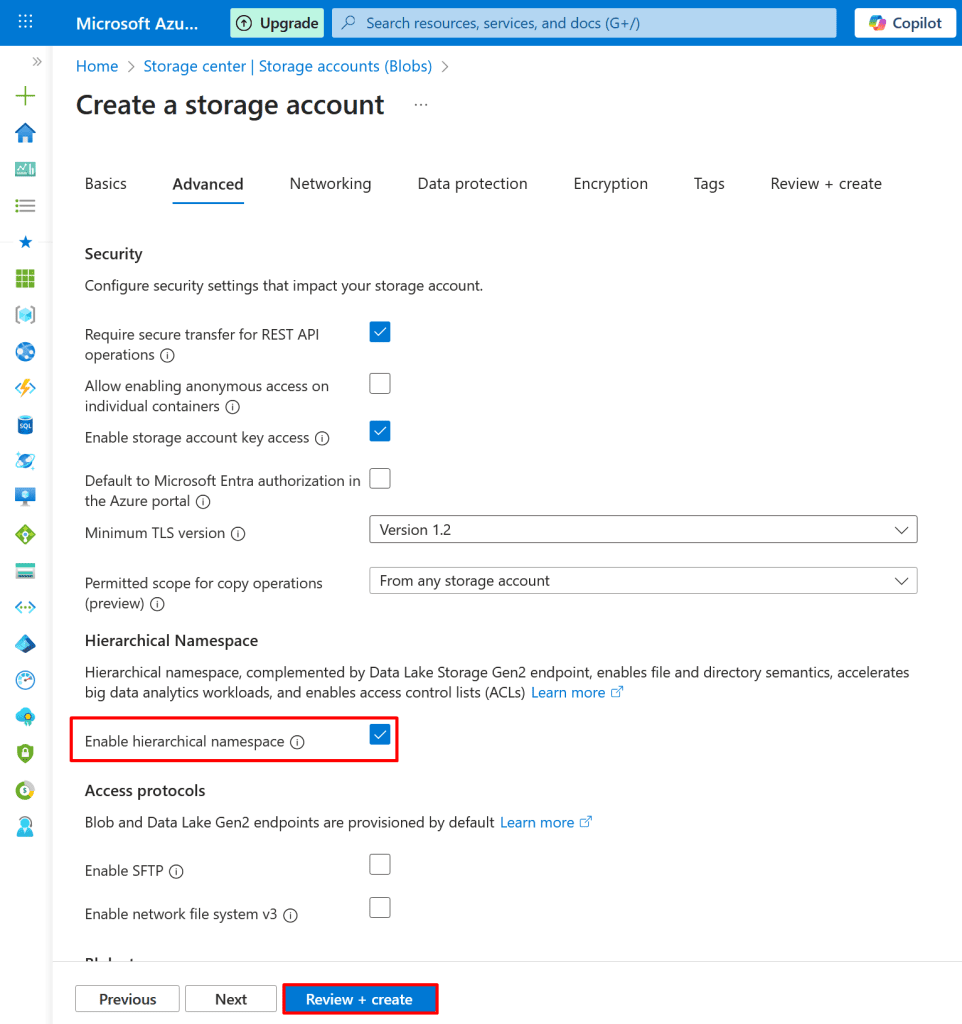
3. Under Advanced → Data Lake Storage Gen2, enable:

  • Hierarchical namespace

Click Review + Create → Create.

*

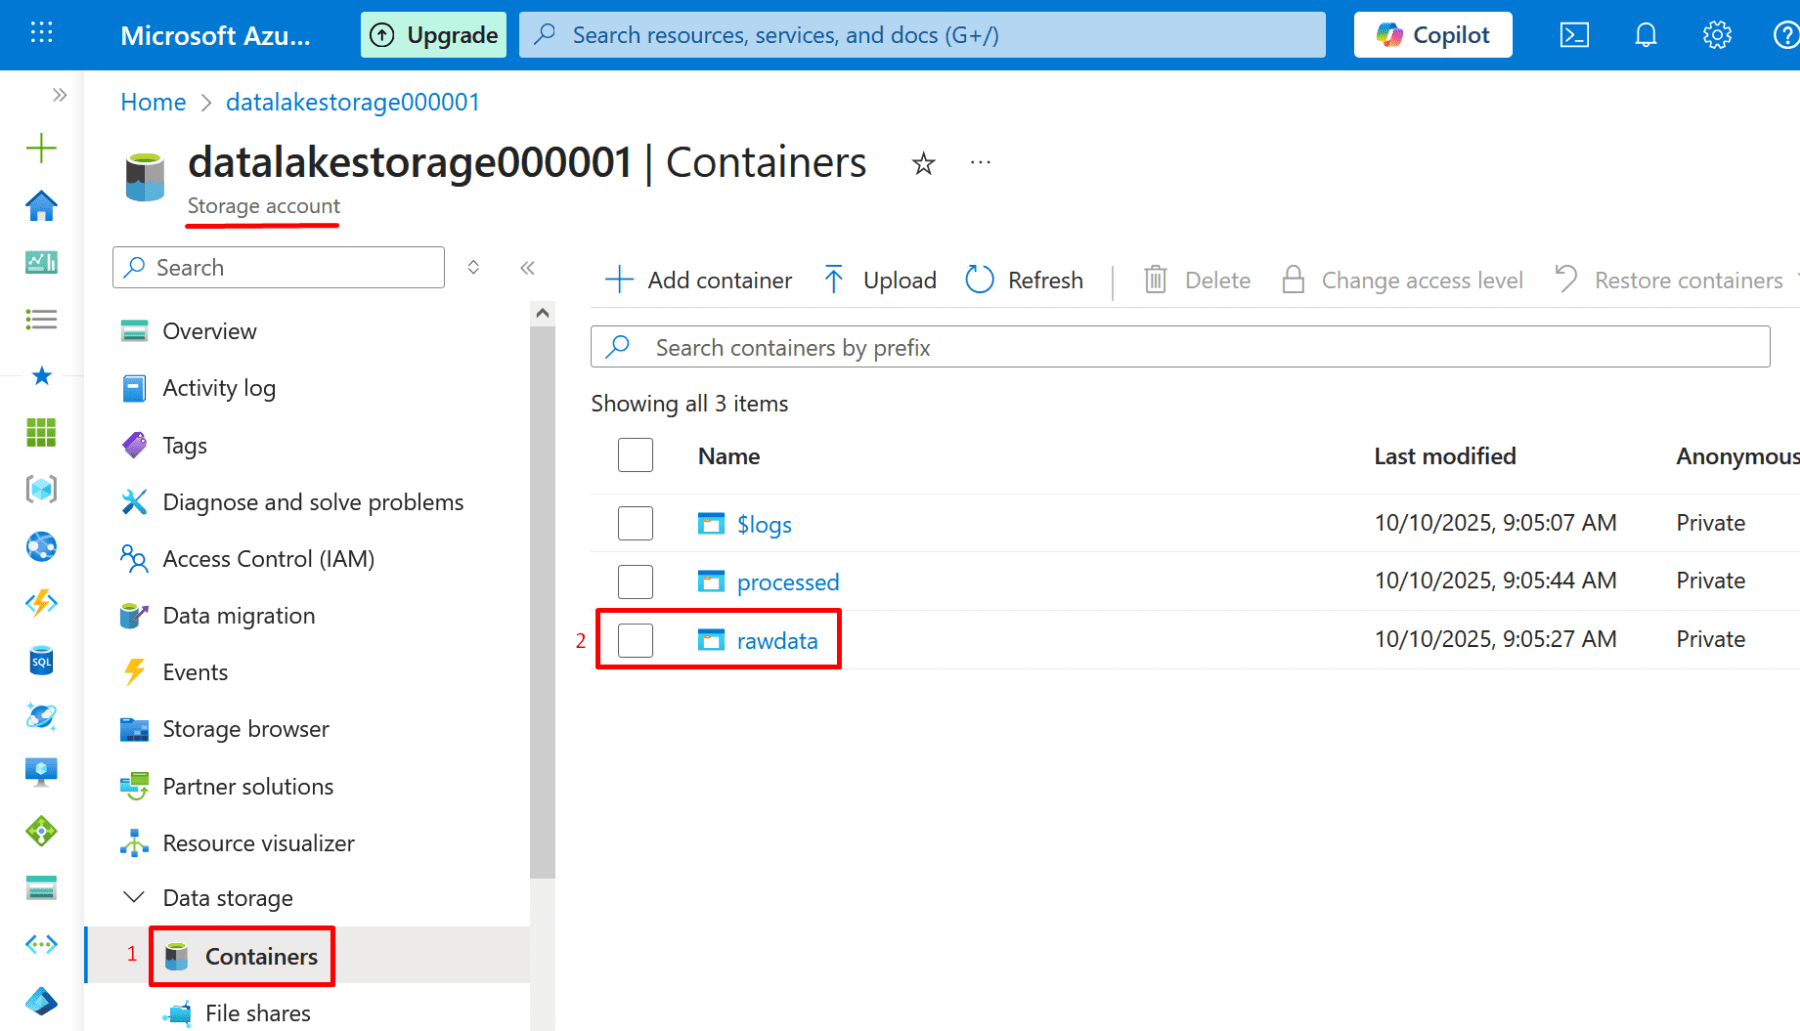
4. After deployment, open the storage account → Containers:

Create a container named rawdata.

  • Click Add container.
  • Give container name.
  • Click create.

*

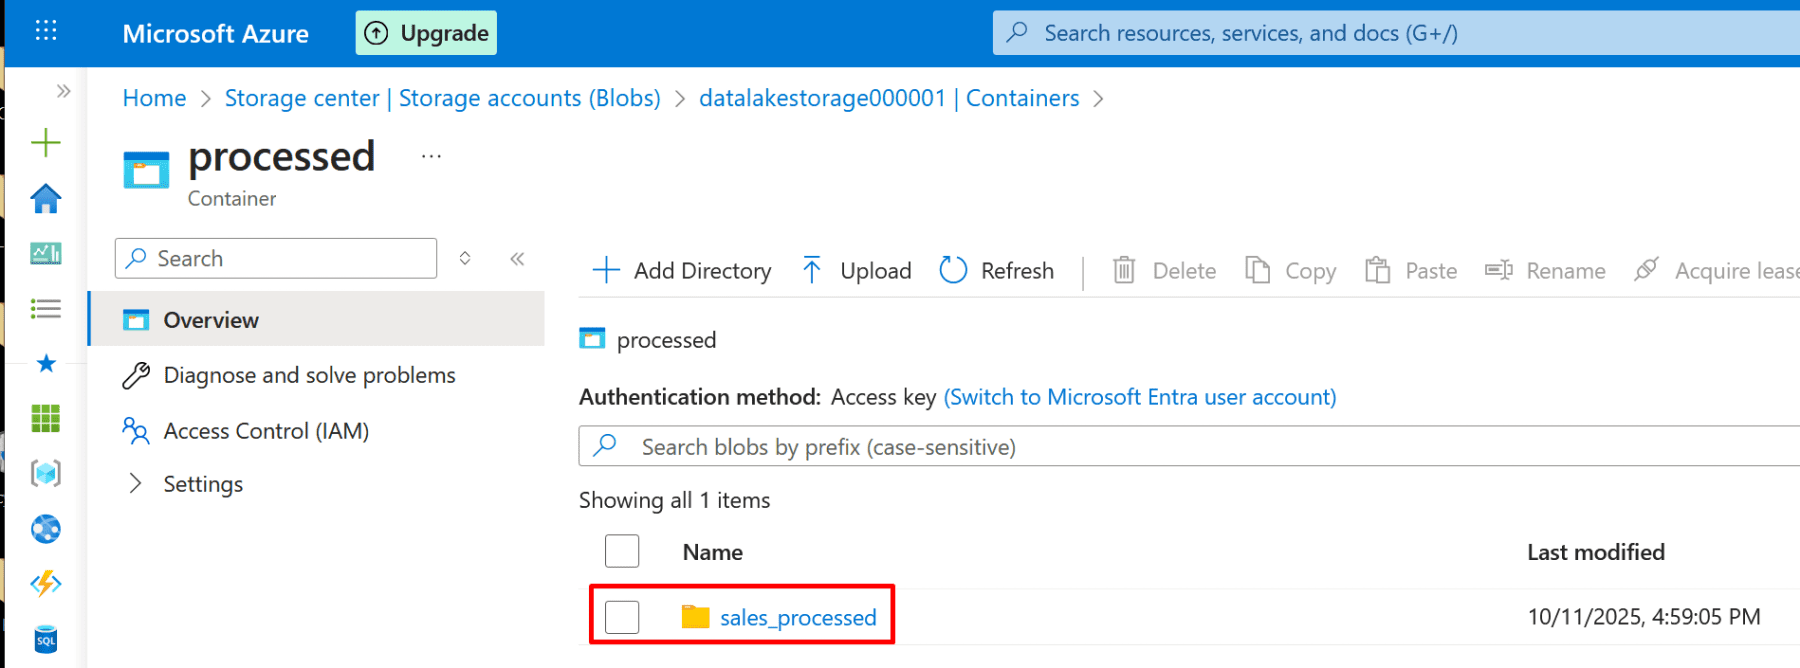
5. Create another container named processed.

  • Click Add container.
  • Give container name.
  • Click create.

*

Create Azure Databricks Workspace.

1. In the portal, search Azure Databricks → Create.

*

2. In Basics tab configure:

  • Workspace name: databricks-demo
  • Pricing tier: Standard (or Premium if available)
  • Region: same as storage account
  • Resource group: use the same one (DatabricksRG)

Click Review + Create → Create.

Note: Databricks will perform data transformation and ETL/ELT operations on data stored in ADLS.

Note: Managed identity is automatically created when creating a Databricks workspace.

*

Create and Configure Databricks Cluster and notebook.

1. Go to your Databricks workspace → Launch Workspace.

*

2. In Databricks Studio → Compute → Create new compute (cluster).

  • Name: cluster-demo
  • Cluster mode: You can choose Single Node (for demo)
  • Click Create

*

3. You must wait until the compute (cluster) status is “Running.”

*

Create a notebook.

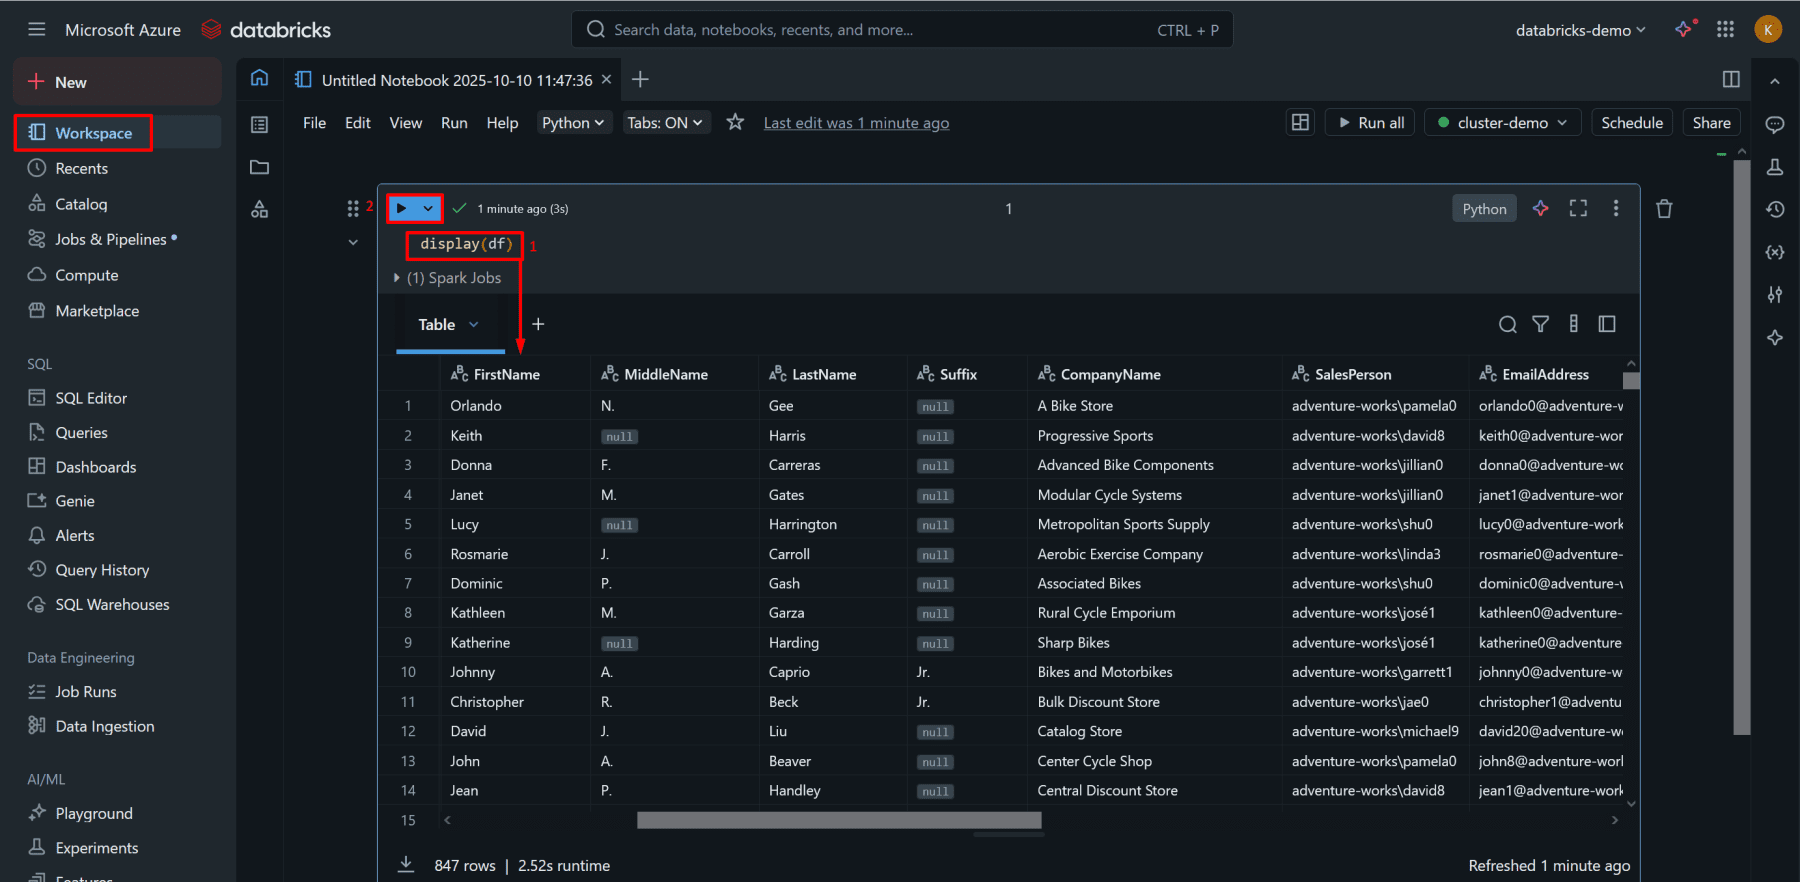
A Databricks notebook is an interactive workspace where you can write, run, and visualize code - typically in Python, SQL, Scala, or R - for data analysis, ETL, and machine learning.

Note: Make sure Databricks is in a running state.

1. In Databricks → Workspace → Create Notebook.

*

2. Attach the notebook to the cluster you created.

*

3. Confirm the switch of resources.

*

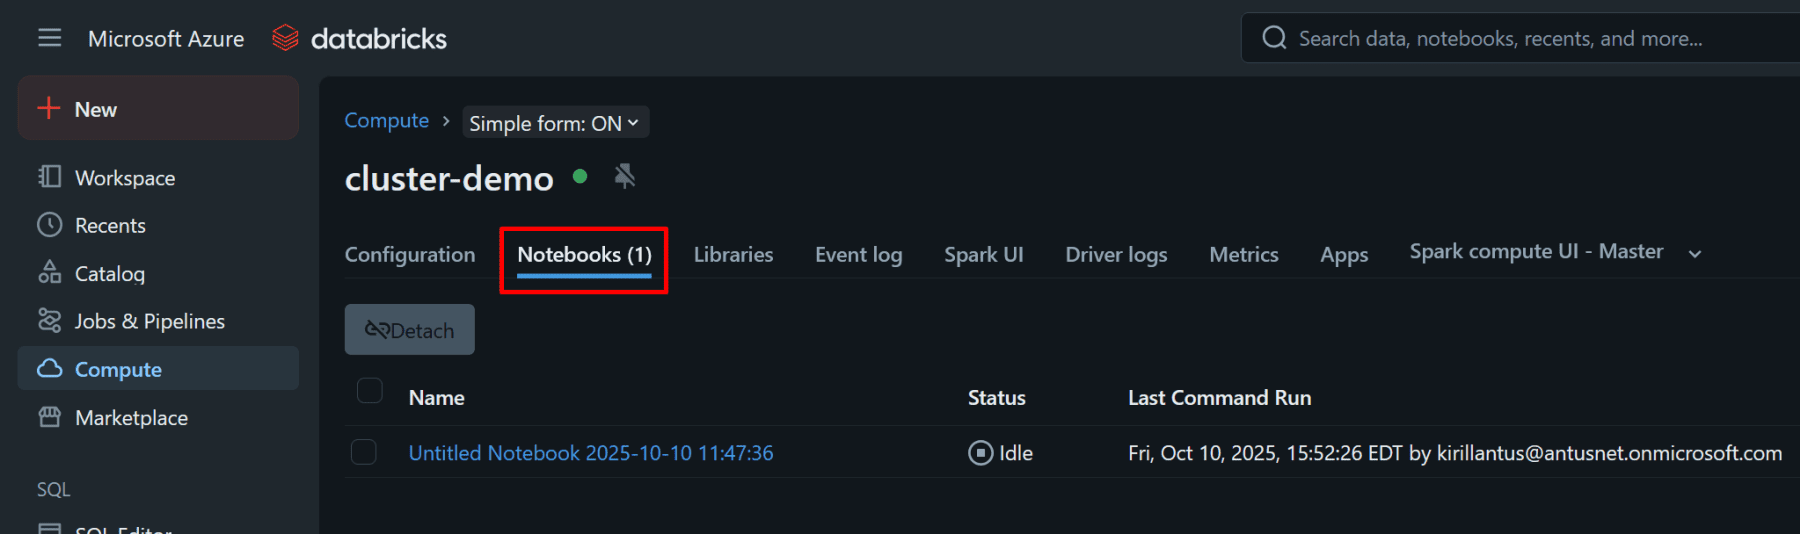
4. Make sure the notebook is attached to the cluster you created.

*

4. Confirm the language is Python.

Verify the Spark version by running: spark.version

Create Azure SQL Server & Database.

Note: Please refer to the project Securing Azure SQL Database for detailed steps on setting up an Azure SQL Database and its associated server.

Note: In this example, we will use the pre-generated Sample database.
Note: You will have to enable managed identity on SQL Server.

You will have to enable managed identity on SQL server.

*

Create Azure Data Factory (ADF), configure its permissions, set up linked services, and perform data movement.

The purpose of Azure Data Factory (ADF) in this project is to act as the data movement and transformation engine,  it automates how data flows between services like Data Lake Storage (ADLS Gen2) and SQL Database, and prepares it for Synapse Analytics to analyze.

1. Go to Create a resource → Data Factory → fill in name, region, and resource group then click Review+Create

Note: Always choose Azure Data Factory v2 , it’s the current and only supported version.

*

Enable a system-assigned managed identity on Azure Data Factory.

1. G0 to your Data Factory in the Azure portal.

  • In the left menu, select Managed Identities (under settings) → System assigned → Status: On → Save.

This will create a managed identity for your Data Factory.

*

Grant the Data Factory managed identity permissions on the Data Lake Storage container ‘rawdata’

1. Go to your Storage Account → Data Lake Storage Gen2 container (rawdata).

*

2. Open Access Control (IAM) → click + Add role assignment.

*

3. Add Role: Storage Blob Data Contributor (allows read/write access).

*

4. Assign access to Data Factory’s managed identity → Select your Data Factory → Review + Assign.

*

Create linked services for your SQL Server database and Data Lake Storage in Azure Data Factory Studio. 

We create a Linked Service using a Managed Identity so that ADF can connect to and access external data sources securely and automatically during ETL/ELT workflows.
Note: In Azure Data Factory, linked services define the source and destination connections for data movement.

1. Go to Data Factory → Overview → click Launch Studio.

*

2. Once in Data Factory Studio

  • On the left panel, click Manage.
  • Under Connections, click Linked Services → + New.

*

Create link for Data lake storage

1. In the New Linked Service window, search for Azure Data Lake Storage Gen2.

  • Select it and click Continue.

*

4. Add a Data Lake linked service (to use as the destination = Sink)

In the new linked service Fill in:

  • Name: AzureDataLakeStorage1
  • Authentication type: select Managed Identity
  • Storage account name: select your account
  • File system: enter rawdata
  • Click Test Connection → should succeed.
  • Click Create.

*

Create link for SQL database

1. Add a SQL Server linked service to use as the source.

  • Click New.
  • Search for Azure SQL database.
  • Click Continue.

*

2. Fill in the parameters for the linked Data Lake service.

  • Name: AzureSqlDatabase1
  • Authentication type: select Managed Identity
  • Database name: db01
  • Server name: sql000000001
  • Click Test Connection → should succeed
  • Click Create

Note: Assign the Databricks managed identity the SQL DB Contributor role at the SQL Server level in Azure, and then grant it db_datareader and db_datawriter roles inside the SQL database to enable read and write access.

Create a pipeline in Azure Data Factory that ingests data into your rawdata container

We create the pipeline so that data flows automatically and securely into the Data Lake, ready for processing and analysis.

1. In Author → Pipeline → + New pipeline.

*

2. Rename it to something like PL_CopyToDataLake.

*

3. Add a Copy Data Activity.

  • In the Activities pane (right side), search for Copy Data.
  • Drag Copy Data into the pipeline canvas.
  • Select it → in the General tab, rename it to Copy_SQL_to_ADLS.

Note: We add a Copy Data activity to copy data from SQL Server into the Data Lake automatically.

*

Choose the Source.

1. Choose the source from which the data will be copied.

  • Click the Source tab.
  • Click + New to create a Dataset for your data source.

*

2. Choose Azure SQL Database and continue.

*

3. Enter name for source set:

  • Name: AzureSqlTable1
  • Linked service: AzureSqlDatabase1 (This is the link you created earlier)
  • Choose table name to copy: SalesLT.Costumer
  • Click OK

*

Choose the destination (sink).

1. Choose the sink (destination).

  • Click on Sink tab.
  • Click New.
  • Search for data lake.
  • Choose Azure Data Lake Storage Gen2.
  • Click Continue.

*

2. Select the desired format for the data (Parquet in this case).

Note: Parquet is a file format commonly used in Azure Data Factory, Data Lake, Synapse, and Databricks.

*

3. Choose the data lake container "rawdata" created previously.

Note: This is where the data will be copied (destination = "sink")

*

4. Select "Flatten hierarchy" as the copy behavior.

Note: We choose “Flatten hierarchy” as the copy behavior to simplify the destination structure. This ensures all data files are written directly into the target folder (rawdata) without creating nested subfolders, making it easier to access and process the files downstream.

*

5. Click publish all.

Note: You should click “Publish all” after creating or editing a Linked Service (or any other resource) in Azure Data Factory Studio.

*

6. Add a Trigger:

Run the pipeline now or schedule it. In this example, we trigger it immediately to verify the table is copied to the rawdata container.

Note: Alternatively, you can schedule a trigger (New/Edit) to automatically copy the selected table to the rawdata container at the interval you specify.

Note: Avoid scheduling frequent triggers in testing to reduce costs. Run manually.

*

7. Go back to the Azure portal and check whether the data has been copied to the rawdata container.

Here, we can see that the data was copied successfully!

Configure Access for Databricks Using Client Credentials OAuth.

Important: If your Databricks workspace is Community Edition / Free, secret scopes, keyvault for storing secrets, and managed identity are not supported, so the CLI commands will fail even after installing.

Note: We use Client Credentials OAuth because it works across tenants/subscriptions and provides explicit, manageable credentials, unlike Managed Identity which requires workspace support and same-tenant access.

1. Create an App Registration in Azure AD.

2. Generate a Client Secret (or certificate) for the app.

4. Assign proper roles to the app on the storage account (e.g., Storage Blob Data Contributor).

5. Mount the container in Databricks using the OAuth configs.

*

Create an App Registration in Azure AD.

1. In the left menu (or search bar), type Microsoft Entra ID and click it.

  • In the left panel, select App registrations.
  • Click + New registration.

*

2. Fill in registration details:

  • Name: DatabricksMountApp
  • Supported account types: Choose Accounts in this organizational directory only (Single tenant)
  • Redirect URI (optional): Leave it empty (not required for client credentials)
  • Then click Register.

*

3. After it’s created, you’ll land on the app’s Overview page.

Copy the following:

  • Application (client) ID → use this for <appId>
  • Directory (tenant) ID → use this for <tenantId>

*

Generate a client secret for the app.

1. In the left menu, click Certificates & secrets

  • Under Client secrets, click + New client secret
  • Add a description (e.g., DatabricksMountSecret)
  • Choose Expiration → e.g., 6 months or 12 months
  • Click Add

Note: Copy the Value immediately (not the Secret ID) - that’s your <clientSecret>

*

Mount the container in Databricks using the OAuth configs.

1. Mount the container in Databricks using the OAuth configs:

You will need Secret Value, AppID, TenantID:

  • Secret Value: D3exx~Qy-xxxx-xx-xxxxxx~xx~xxxxxx-xxxY
  • Application (client) ID: f6a0xxxx-xxxx-xxxx-xxxx-xxxxx7ebdb55
  • Directory (tenant) ID: aa2a22xx-xxx-xxx-xxx-xxxxxx12a0d

Go to your notebook and paste the following Python code:

Copy code:

*

2. Replace the appId, clientSecret, and tenantId with your values, and then execute the code.

*

3. Read your Parquet file:

Copy code:

df = spark.read.parquet("/mnt/flightdata/")
display(df)

Transform Data in Databricks.

Transform raw data by applying calculations or modifications (e.g., computing TotalPrice) and save the cleaned, structured data to the processed container in ADLS for downstream use.

*

Add transformation logic.

Note: This code is performing a data transformation it creates two new columns inside your DataFrame (df_transformed) based on the existing data.

Creates a new column called FullName by concatenating the values of FirstName and LastName, separated by a space.

Adds another column called Source and fills it with the static value "SampleDB" for all rows.

Copy code:

*

2. Save the transformed data to the processed container.

Confirm Authentication Method

If you’re using Client Credentials OAuth (App Registration + Key Vault), make sure the following configs are set before running the write command:

Note: No mount is needed as long as you’ve configured Spark with the correct credentials. (code below).

Copy code:

*

3. Save the transformed data to the processed container created earlier.

df_transformed.write.mode("overwrite").parquet(
"abfss://processed@datalakestorage000001.dfs.core.windows.net/sales_processed/"
)

*

4. Go back to Azure storage → container → processed and verify that the new data is there.

*

5. Query the processed container.

Copy code:

df = spark.read.parquet("abfss://processed@datalakestorage000001.dfs.core.windows.net/sales_processed/")

display(df)

*

6. Confirm that df (data frame) actually has data.

Copy code:

df.printSchema()
df.show(3)

*

What Happened?

You read raw customer data (from your sample SQL database) into a Spark DataFrame (df).

You then added two new columns:

  • FullName → combined FirstName and LastName into one readable name.
  • Source → added a constant value "SampleDB" to identify where this dataset came from.

Finally, you wrote the transformed data to your processed container in ADLS in Parquet format.

Note: This step demonstrates ETL (Extract, Transform, Load) using Databricks and stores the clean data for querying.

*

Create Azure Synapse Analytics Workspace.

Note: Synapse provides a serverless environment to query data directly from ADLS.

1. In the portal → Search Azure Synapse Analytics → Create.

*

2. Basics tab Configuration:

  • Workspace name: synapse-demo01
  • Select the same resource group and region
  • Data Lake Storage Gen2: choose existing (datalakestorage001)
  • File system: processed
  • Click Review + Create → Create.

*

3. Assign the Storage Blob Data Reader role to the Synapse workspace.

*

Query Processed Data in Synapse.

1. Go to Synapse Studio → Develop → SQL Script → New SQL Script → Click publish all

*

2. Run the query to read the first 100 lines from the transformed data:

Copy code:

SELECT TOP 100 *
FROM OPENROWSET(
         BULK 'https://datalakestorage000001.dfs.core.windows.net/processed/sales_processed/',
         FORMAT = 'PARQUET'
) AS [result];

Note: You should see transformed data from Databricks.

Note: This confirms integration between Synapse and ADLS, allowing direct analysis without moving data.

*

Conclusion

In this guide, we walked through an end-to-end Azure data pipeline: from creating a Resource Group and ADLS Gen2 storage, to configuring a Databricks workspace, moving and transforming sample SQL data, and finally querying the processed data in Azure Synapse Analytics.

Key takeaways:

  • You learned how to securely connect Databricks to ADLS using Client Credentials OAuth.
  • You applied PySpark transformations to enrich and prepare data for analytics.
  • You successfully built a pipeline that flows from raw data ingestion to structured data in a data warehouse, demonstrating real-world data engineering practices.
  • This workflow highlights best practices for data security, transformation, and cross-service integration in Azure.

Completing this guide equips you with practical, expert-level skills in managing Azure data services and building scalable, secure data pipelines ready for analysis or reporting.

*

Written by Kirill.A - Azure & Cybersecurity Consultant at AntusNet

➤ Want more? Browse all our Azure implementation guides.

Need help implementing secure Azure solutions?

Contact us for a free consultation.

    error: Content is protected !!