
Implementing DNS Name Resolution in Azure
Task Details
1. Create a DNS Zone in Azure DNS
Begin by creating a DNS zone within Azure DNS, which serves as the container for your domain and its associated records. This zone will define the namespace for your domain and enable you to manage name resolution for services hosted in Azure or externally.
2. Add a DNS Record to the Zone
Once the DNS zone is set up, create a DNS record, such as an A record, CNAME, or TXT, to map your domain name to the appropriate IP address or resource. This step allows client systems and services to resolve your domain name to its corresponding endpoint.
3. Validate Azure DNS Resolution Globally
To ensure your DNS configuration is properly propagated and functioning across the globe, perform DNS lookups using tools like nslookup or dig. Confirm that your domain name resolves correctly from various regions, verifying the global availability and reliability of Azure DNS.
*
Steps
1. Create a DNS zone in Azure DNS
In the search box, type "DNS zone" and select "DNS zones" from the results.

*
2. On the Basics tab, enter the required values for each setting as follows. Then select Review Create and then select Create.

*
3. After the deployment is complete, click Go to resource to view your DNS zone.

*
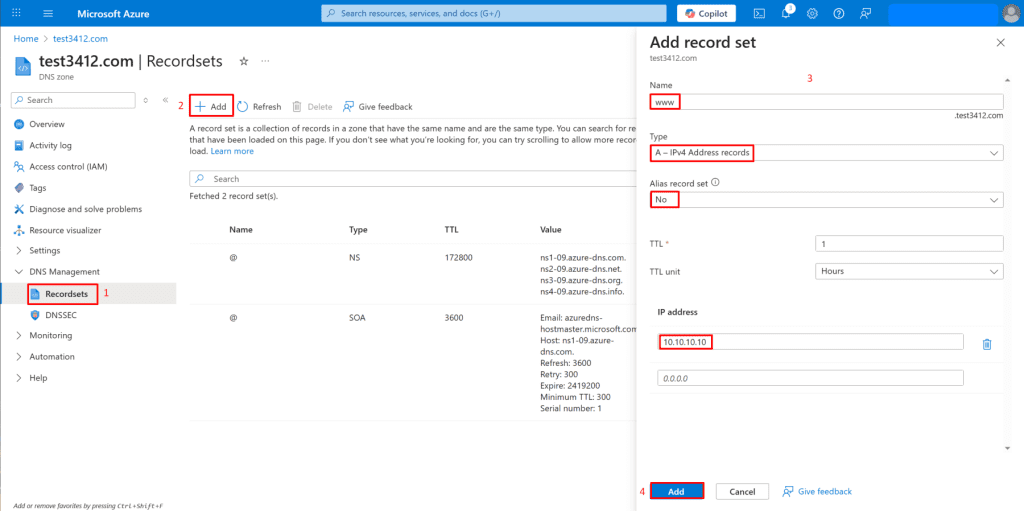
4. To create a DNS record for your domain, click "Recordsets" on the left blade under "DNS Management" then select Add to configure the record.
- In the Azure portal, navigate to your DNS zone.
- In the left-hand menu, under "DNS Management", click "Recordsets".
- Add Record Set: Click the "+ Add" button.
Configure Record Set:
- Enter the record name (e.g., "www").
- Select the record type (e.g., "A - IPv4 Address records").
- Alias record set: Keep as "No".
- Enter the IP address (e.g., "10.10.10.10").
- Click the "Add" button at the bottom to create the record set.
Note: In a real-world scenario, you would enter the public IP address that points to your website or service on the internet.
*
5. You can now see that a custom record set has been successfully added to your DNS zone.

*
6. Verify your global Azure DNS.
Even without a registered domain name, you can still verify that Azure DNS is working correctly by using the nslookup tool. It allows you to check if your custom DNS record is being resolved properly, confirming that your Azure DNS configuration is functioning as expected.
To verify Azure DNS using Cloud Shell, follow these steps:
- In the Azure Portal, click the Cloud Shell icon at the top right.
- Select the Bash environment if prompted.

*
7. Once the Cloud Shell loads, use the nslookup command to verify DNS resolution.
Enter the following command in Cloud Shell, replacing the example domain and name server with your own DNS zone and name server (NS) address:
Command:
nslookup
nslookup www.test3412.com ns1-09.azure-dns.com

*
What just happened?
Imagine you've just put a new entry into a phone book (your DNS zone) saying "If someone asks for 'www.yourwebsite.com', tell them the number is '10.10.10.10'."
What happened here is like checking if that phone book entry works:
We're looking at the "phone book" (DNS Zone: test3412.com) in Azure, and we can see the new entry for "www" pointing to "10.10.10.10".
Then, someone uses a tool (nslookup) to ask the specific "phone company" (Azure DNS server: ns1-09.azure-dns.com) for the number of "www.test3412.com".
The "phone company" replies, "Yes, www.test3412.com's number is 10.10.10.10."
In short: We added a new address for a website and then immediately checked using a special tool to make sure that address was correctly registered and could be found.
*
Conclusion
As part of implementing custom DNS name resolution in Azure, I created a DNS zone named test3412.com using Azure DNS and added an A record pointing www.test3412.com to the private IP address 10.10.10.10. To verify the configuration, I used Azure Cloud Shell with the nslookup command, querying Azure’s authoritative name server ns1-09.azure-dns.com. The successful resolution confirmed that Azure DNS was correctly serving the custom record. This setup demonstrates the ability to configure and validate DNS name resolution in a cloud-native environment, a critical skill for managing scalable and secure network infrastructures in Azure.
*
Written by Kirill.A - Azure & Cybersecurity Consultant at AntusNet