Firewall rule
Task Details
Creating a firewall rule will help your organization control both inbound and outbound network access, which is a critical component of a comprehensive network security strategy. Specifically, you aim to create and test the following infrastructure components:
1. A virtual network with three subnets: one for the workload, one for the jump host, and one for the firewall.
2. A virtual machine in each subnet.
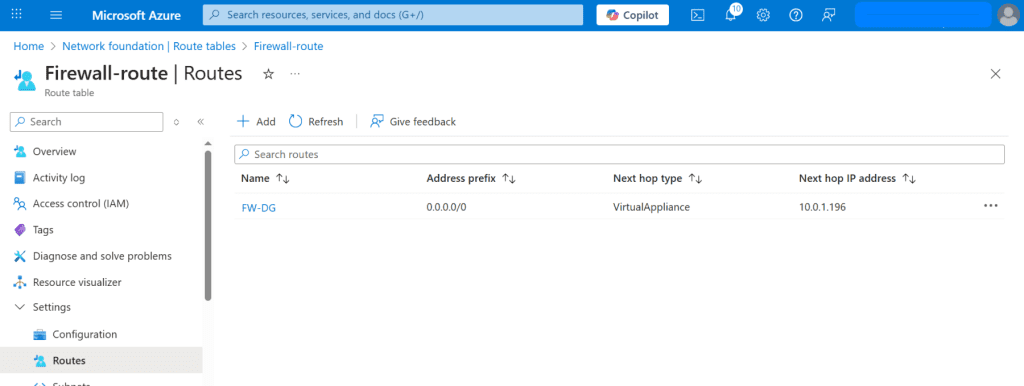
3. A custom route that forces all outbound traffic from the workload subnet to pass through the firewall.
4. Firewall application rules that allow outbound traffic only to www.bing.com.
5. Firewall network rules that permit external DNS server lookups.
Architecture Diagram

*
Steps
1. Create a virtual network named Test-FW-VN with an address space of 10.0.0.0/16, and add four subnets: Workload-SN for the workload, Jump-SN for the jump host, AzureFirewallSubnet for the firewall, and AzureFirewallManagementSubnet for forced tunneling.


*
2. On the IP addresses tab, delete the existing subnet, then create four subnets: Workload-SN for the workload, Jump-SN for the jump host, AzureFirewallSubnet for the firewall and AzureFirewallManagementSubnet subnet for forced tunneling.
Note: AzureFirewallManagementSubnet subnet for forced tunneling is now required when also using Firewall SKU basic.
Workload-SN subnet
- Click "Add a subnet."
- In the appeared panel on the right, name the subnet (e.g., "Workload-SN").
- Set the starting IP address (e.g., "10.0.2.0").
- Click "Save."

*
Jump-SN subnet
- Click "Add a subnet."
- In the appeared panel on the right, name the subnet (e.g., "Jump-SN").
- Set the starting IP address (e.g., "10.0.3.0").
- Click "Save."
Note: Srv-Jump is a secure gateway VM (also called a jump box) placed in a public subnet, used to remotely access and manage other resources (like VMs) inside a private Azure virtual network. Instead of exposing all VMs to the internet, only the Jump-Srv has a public IP, helping restrict and control external access while maintaining internal connectivity.

*
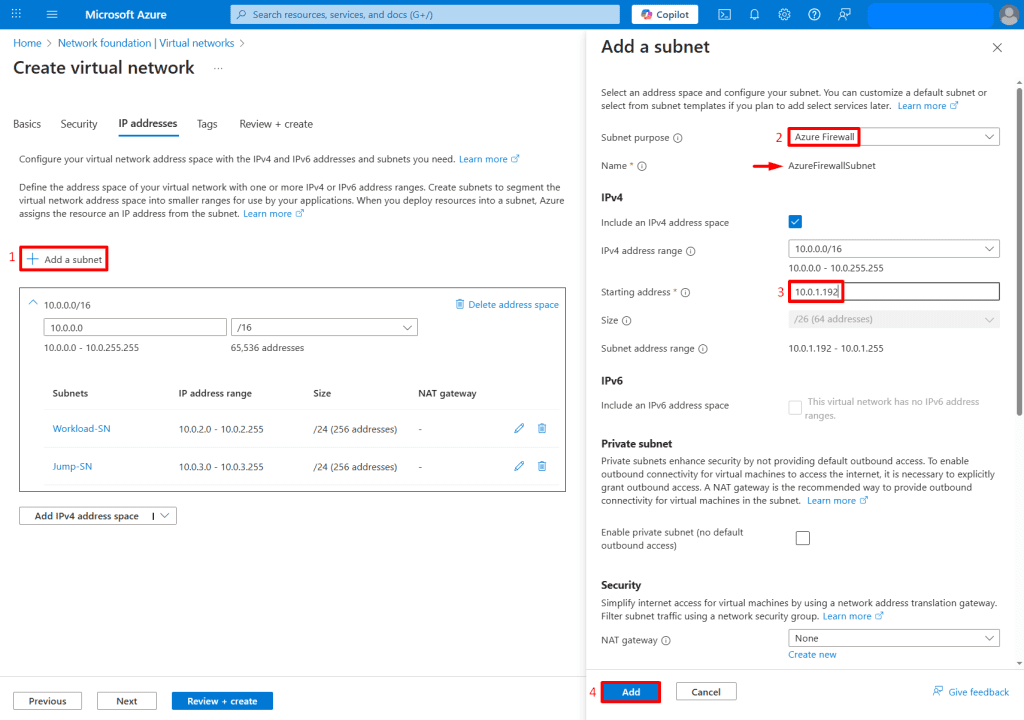
AzureFirewallSubnet subnet
- Click "Add a subnet."
- In the appeared panel on the right, choose Subnet purpose as AzureFirewall.
- Azure automatically allocates the internal IP for the Azure Firewall from the subnet’s address space (e.g., "10.0.1.192").
- Click "Save."
Note: You must create a subnet named exactly AzureFirewallSubnet (case-sensitive) with at least a /26 address space. You can assign a Public IP manually to the firewall (AzureFirewall → Public IP configuration), but the internal IP is auto-assigned.
*
AzureFirewallManagementSubnet subnet
- Click "Add a subnet."
- In the appeared panel on the right, choose Subnet purpose as (e.g., "AzureFirewallManagementSubnet").
- Azure automatically allocates the internal IP for the Azure Firewall from the subnet’s address space (e.g., "10.0.1.128").
- Click "Save."
Note: You only need to configure and associate a Public IP manually (if needed for outbound access or DNAT).
AzureFirewallManagementSubnet must be at least /26.

*
3. After creating the four subnets, ensure all four subnets are listed, then click "Review + Create" to deploy. Once deployment is complete, click "Go to resource", and you will see your four subnets under the Subnets tab of the virtual network.

*
4. Create two virtual machines: Srv-Work VM in the Workload subnet and Srv-Jump VM in the Jump subnet.
Srv-Work VM

*
5. In the Virtual Machines section, select + Create a virtual machine, then enter the following values on the Basics tab.
Resource group : Select your resource group
Instance details :
- Virtual machine name : Enter Srv-Work
- Region : Select (US) East US
- Image : Select Windows Server 2022 Datacenter : Azure Edition - x64 Gen2
- VM architecture: Select x64
- Size : Select Standard_B2s
Administrator Account :
- Username : Enter a username
- Password : Enter a password
- Confirm password : Re-enter password
Inbound Port rules :
- Public inbound ports : Select Allow selected ports
- Select inbound ports: Select RDP(3389)

*
6. Click Next to proceed to the Disks tab and configure the desired disk settings then click "Review + create"

*
7. On the Networking tab, assign the Srv-Work VM to the Workload-SN subnet, apply the following settings, and then click Review + Create.

*
8. After the Srv-Work VM is created, note the public and private IP addresses of the Srv-Work VM.

*
Srv-Jump VM
Note: Jump-Srv is used as a secure gateway VM to connect to other resources inside a private Azure virtual network.

*
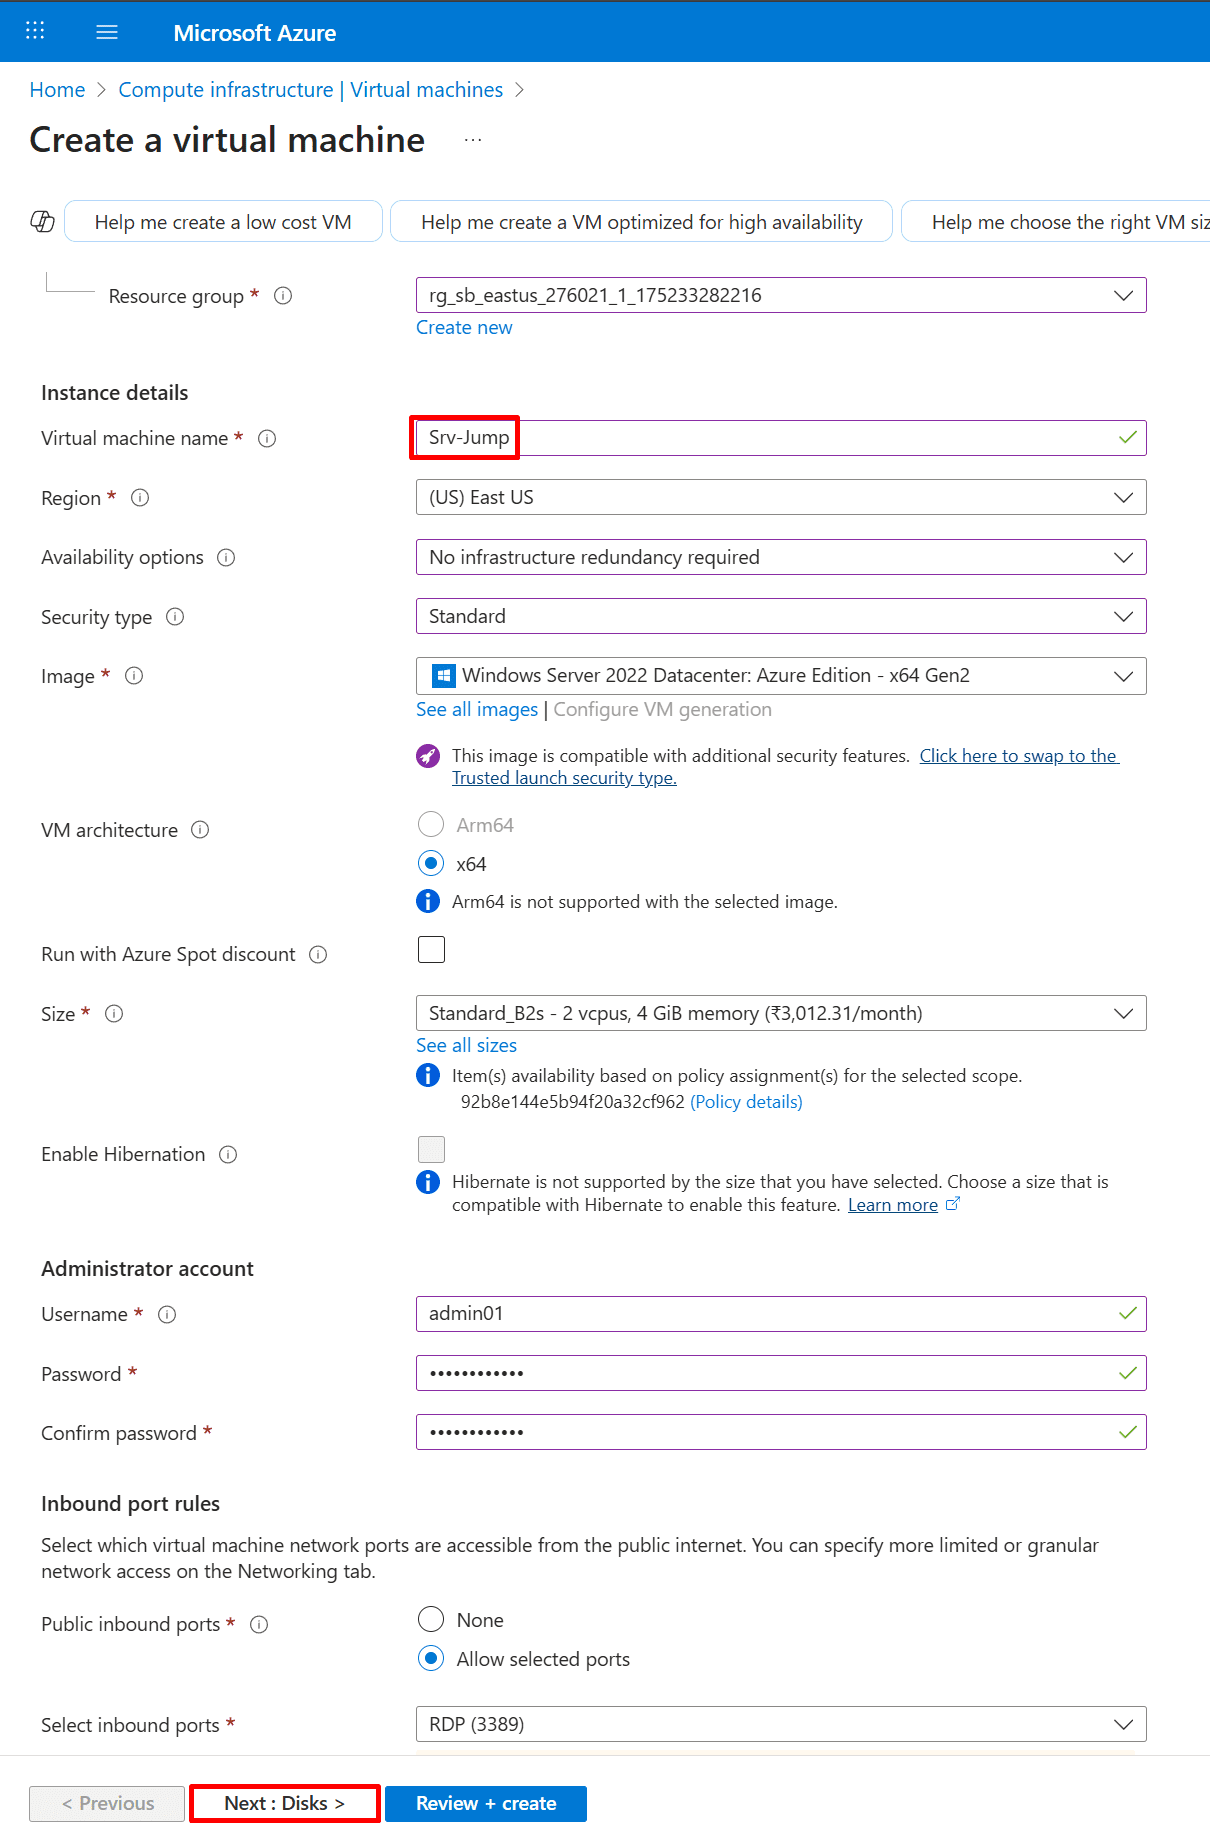
9. In the Virtual Machines section, select + Create a virtual machine, then enter the following values on the Basics tab.
Resource group : Select your resource group
Instance details:
- Virtual machine name : Enter Srv-Jump
- Region : Select (US) East US
- Image : Select Windows Server 2022 Datacenter : Azure Edition - x64 Gen2
- VM architecture: Select x64
- Size : Select Standard_B2s
Administrator Account:
- Username : Enter a username
- Password : Enter a password
- Confirm password : Re-enter password
Inbound Port rules:
- Public inbound ports : Select Allow selected ports
- Select inbound ports: Select RDP(3389)
*
10. Click Next to proceed to the Disks tab and configure the desired disk settings then click "Review + create"
*
11. On the Networking tab, assign the Srv-Jump VM to the Jump-SN subnet, apply the following settings, and then click Review + Create.

*
12. After the Srv-Jump VM is created, note the public and private IP addresses of the Srv-Work VM.