Configuring network access to Azure Storage Accounts using a private endpoint & VM disk encryption

Task Details
- Create Virtual Network
- Create a Storage Account with a private endpoint.
- Create container in storage account.
- Create a virtual machine and reduce the attack surface by allowing connections only from a specific IP address.
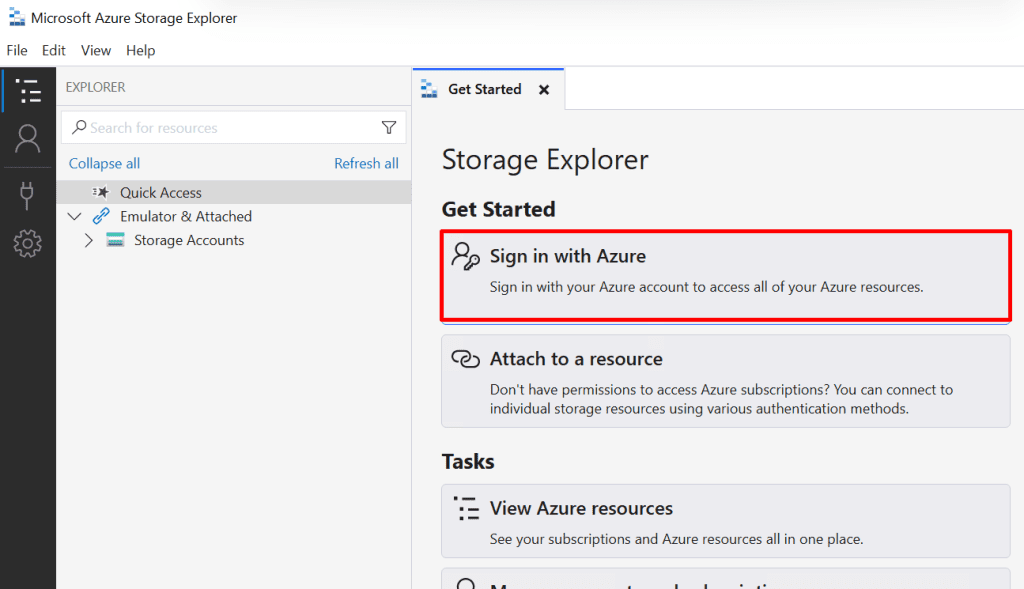
- Access the storage account from a virtual machine using Azure Storage Explorer.
- Protect virtual machine disks using encryption keys from Azure Key Vault, accessed through the VM’s managed identity.
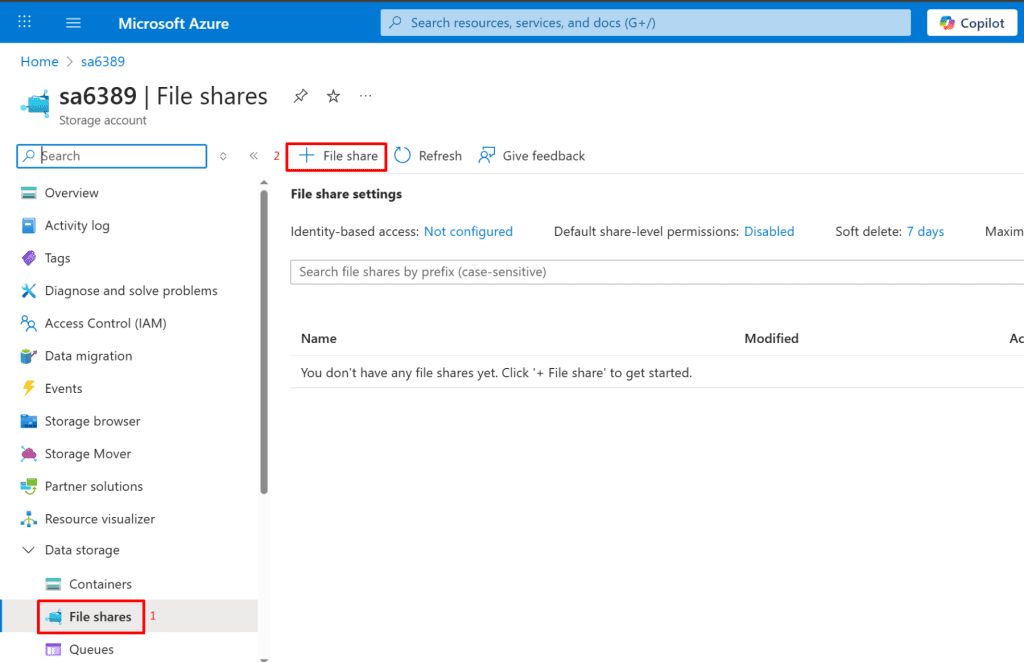
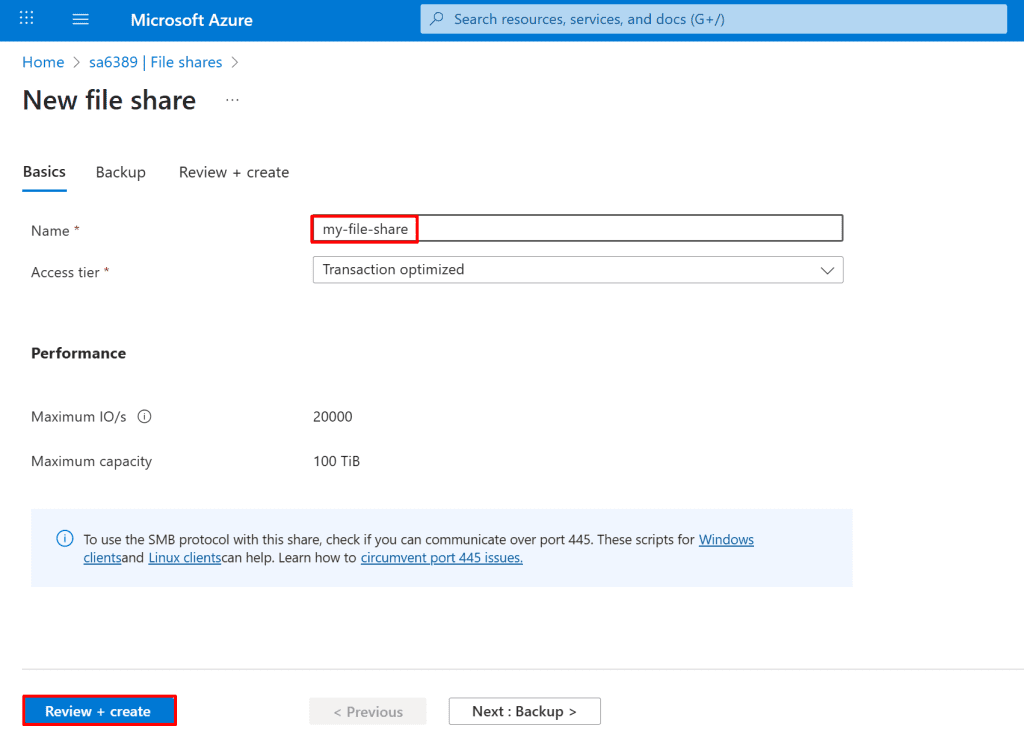
- Bonus: Create a file share in your Azure Storage account and map it to your local system as a network drive.
*
Steps
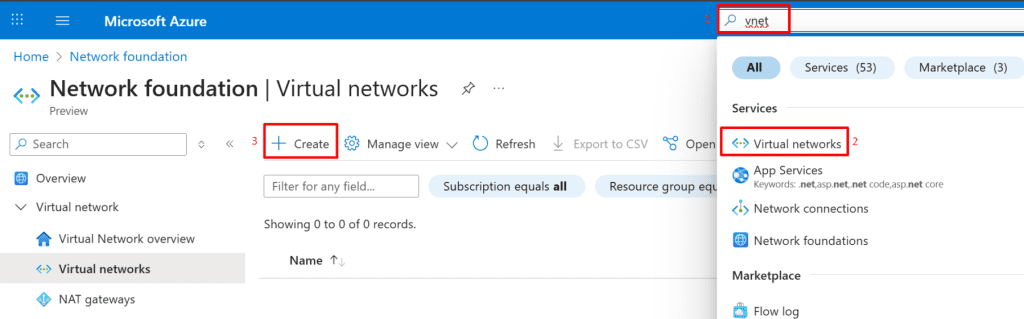
1. Create a virtual network with three subnets.
- Search for "vnet": In the Azure portal search bar, type "vnet" and select "Virtual networks" under Services.
- Create Virtual Network: Click the "+ Create" button on the Virtual networks page.
Basic Details:
- Select your "Subscription" and "Resource group".
- Set "Virtual network name" to "vnet1".
- Choose your desired "Region".
- Click "Next"

*
2. Define and configure three subnets in Virtual Network 1 (VNet1)
Storage subnet
- Add Subnet: On the left side, click "+ Add a subnet."
- Name Subnet: On the right, set "Name" to "storage"
- Configure IP Range: Set "Starting address" to "10.0.1.0" and "Size" to "/24 (256 addresses)."
- Save: Click "Save" at the bottom right.

IT subnet
- Add Subnet: On the left side, click "+ Add a subnet."
- Name Subnet: On the right, set "Name" to "IT"
- Configure IP Range: Set "Starting address" to "10.0.2.0" and "Size" to "/24 (256 addresses)."
- Save: Click "Save" at the bottom right.

Default subnet
- Add Subnet: On the left side, click "+ Add a subnet."
- Name Subnet: On the right, set "Name" to "default"
- Configure IP Range: Set "Starting address" to "10.0.3.0" and "Size" to "/24 (256 addresses)."
- Save: Click "Save" at the bottom right.

*
3. After deploying the three subnets, click Review + Create to deploy the virtual network and its subnets.

*
4. Create a Storage Account with a Private Endpoint for secure, private access.
- Search for "storage": In the Azure portal search bar, type "storage".
- Select "Storage accounts": Under Services, click on "Storage accounts".
- Create Storage Account: On the Storage accounts page, click the "+ Create" button.
Note: Creating a Storage Account with a Private Endpoint ensures that access to the storage resource stays entirely within your Azure virtual network. This eliminates exposure to the public internet, enhances security, and helps meet compliance requirements. Always ensure your DNS is properly configured to resolve the private endpoint IP to avoid connectivity issues.

*
5. In the Basics tab, provide a unique name for the Storage Account and other details.
Project Details:
- Select your "Subscription"
- Choose your "Resource group
Instance Details:
- Enter "sa783709" as the "Storage account name".
- Select your "Region" (e.g., "(US) East US").
- Choose "Standard" for "Performance".
- Select "Locally-redundant storage (LRS)" for "Redundancy".
Next: Click the "Next" button at the bottom.
Note: LRS is generally cheaper than ZRS due to its limited redundancy scope.
Redundancy Options:
Locally Redundant Storage (LRS): Copies your data synchronously three times within a single physical location (data center).
Zone-Redundant Storage (ZRS): Copies your data synchronously across three Azure Availability Zones within the primary region, offering higher durability.

*
6. In the Networking tab, configure the private endpoint to allow access only from the storage subnet, then click Review + create.
- Navigate to Networking: In the "Create a storage account" wizard, click on the "Networking" tab.
- Disable Public Access: Select "Disable public access and use private access" under "Network access."
- Add Private Endpoint: Click on "+ Add private endpoint."
- Create Private Endpoint (right-hand pane):
- Select your "Subscription", "Resource group", and "Location".
- Set "Name" to "storage_private_endpoint".
- For "Storage sub-resource", choose "blob".
- Select your "Virtual network" (e.g., vnet1 ).
- Select your "Subnet" (e.g., "storage").
- Confirm "Integrate with private DNS zone" is "Yes".
OK: Click "OK" to create the private endpoint.

Note: See full list here: Azure Private Endpoint Supported Services
⚠ Important - Network Routing Preference (in Network Routing section): By default, storage accounts use Microsoft network routing, keeping traffic on Microsoft’s global backbone. This can improve performance but may increase inter-region egress costs. To reduce costs in some scenarios, switch to Internet routing, which hands off traffic to a transit ISP sooner.

*
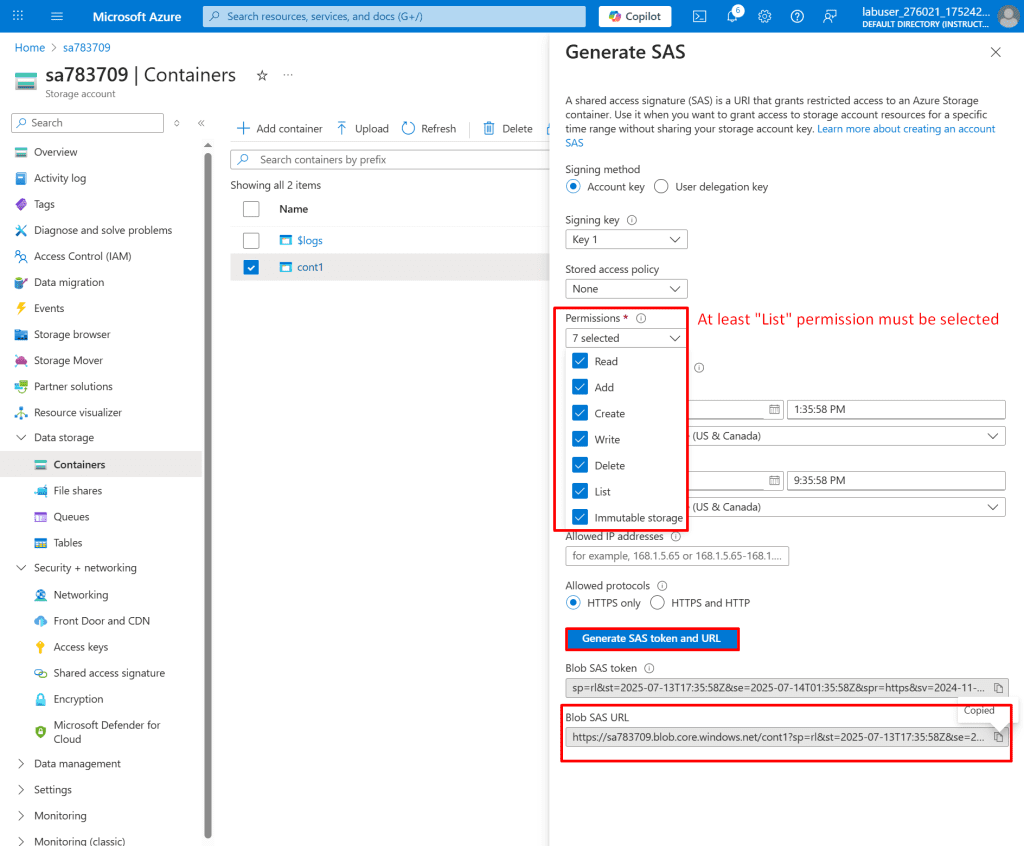
7. Create a container inside the Storage Account named sa783709.
- Navigate to Containers: In the storage account sa783709 blade, click on "Containers" under "Data storage" in the left-hand menu.
- Add Container: Click the "+ Add container" button.
- Name Container: In the "New container" pane, type "cont1" into the "Name" field.
Create: Click the "Create" button.
Note: Use lifecycle management rules to automatically move blobs to Cool or Archive tiers to reduce storage costs based on access patterns.
- Go to your storage account in the Azure portal.
- Under Data Management, select Lifecycle Management.
- Create rules to automatically move blobs to Cool or Archive tiers based on conditions like last modified date or access patterns.
⚠ This helps optimize costs by storing rarely accessed data in lower-cost tiers.

*
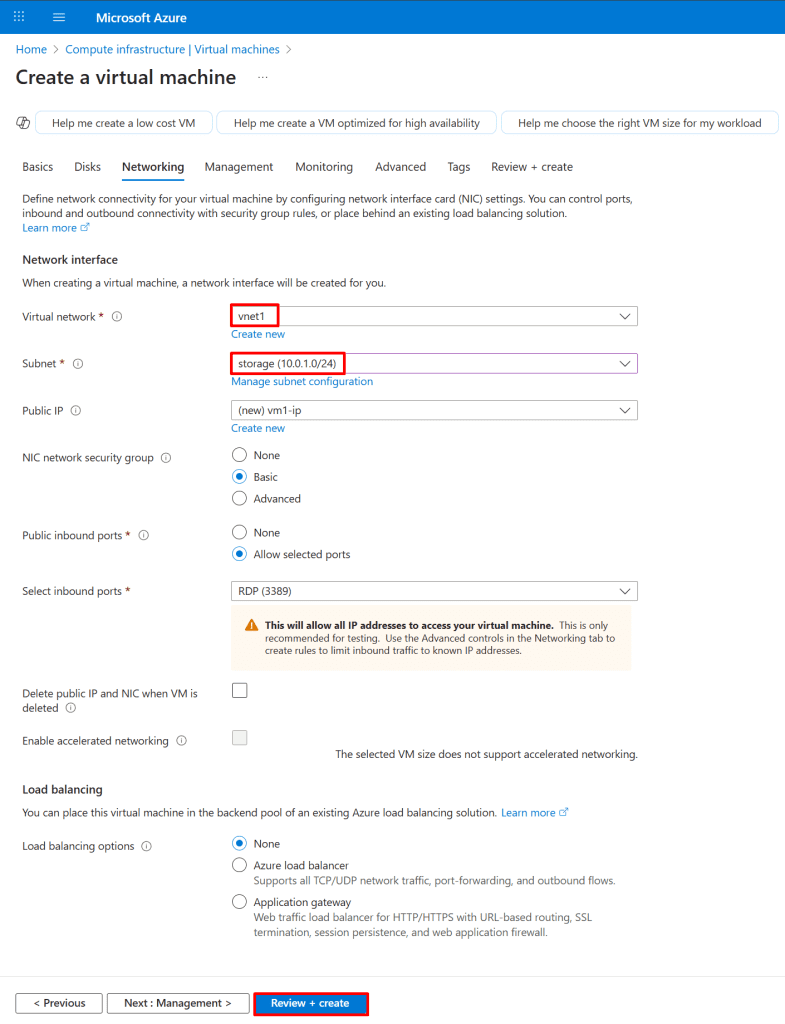
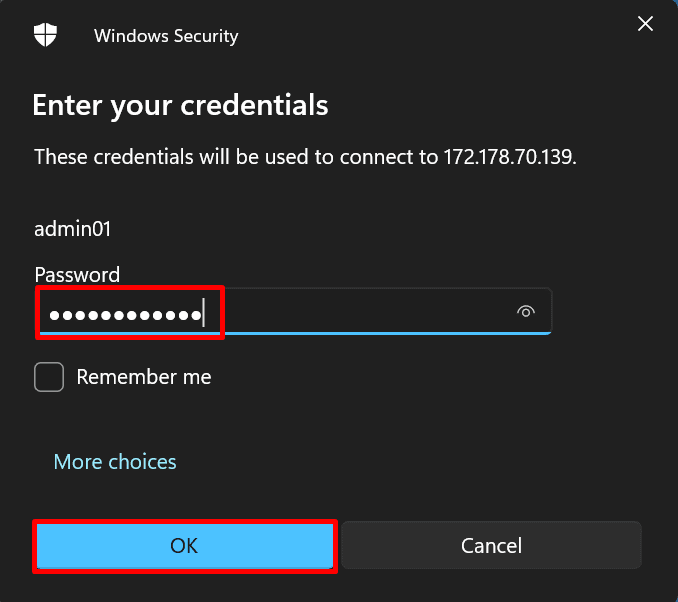
8. Deploy a virtual machine within the Storage subnet of vnet1 virtual network to enable secure, private communication via the private endpoint.
- Search for "vm": In the Azure portal search bar, type "vm".
- Select "Virtual machines": Under Services, click on "Virtual machines".
- Create Virtual Machine: On the Virtual machines page, click the "+ Create" button.

*
9. Provide basic vm1 settings as follows:
Instance details:
• Virtual machine name : Enter vm1
• Region : Select (US) East US
• Image : Select Windows Server 2022 Datacenter : Azure Edition - x64 Gen2
• VM architecture: Select x64
• Size : Select Standard_B2s
Administrator Account:
• Username : Enter a username
• Password : Enter a password
• Confirm password : Re-enter password
Inbound Port rules:
• Public inbound ports : Select Allow selected ports
• Select inbound ports: Select RDP(3389)

*
10. Click Next to proceed to the Disks tab and configure your desired disk settings.