Loading...

Azure Quick Links

Azure Cloud Projects

Privileged Access and Monitoring

Configure PIM to assign a User Administrator role, set up a Log Analytics workspace, enable PIM audit logs, integrate Monitor and Entra ID logs, and verify them in Log Analytics.

Task Details

In this project, we’ll configure PIM to assign the User Administrator role with approval, set up a Log Analytics workspace, and enable PIM audit logging. We’ll then integrate Azure Monitor and Entra ID logs to achieve centralized monitoring and enhanced visibility of privileged role activities.

1. Assign user a User Administrator role using Privileged Identity Management (PIM).

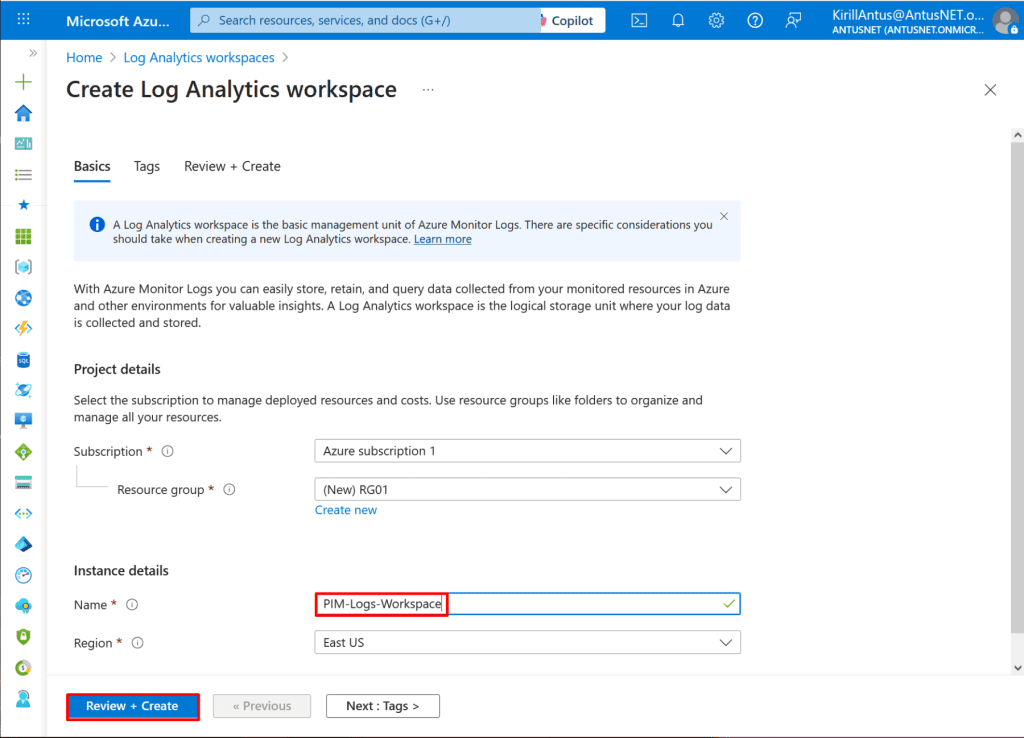
2. Create a Log Analytics Workspace.

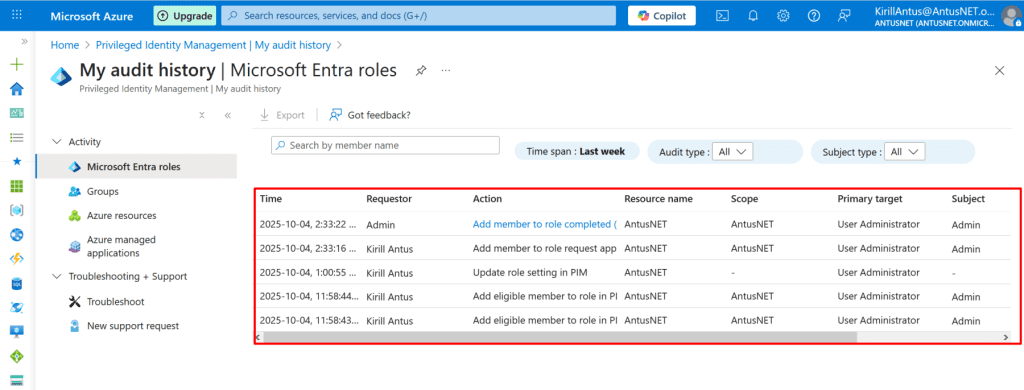
3. Enable PIM Audit Logs.

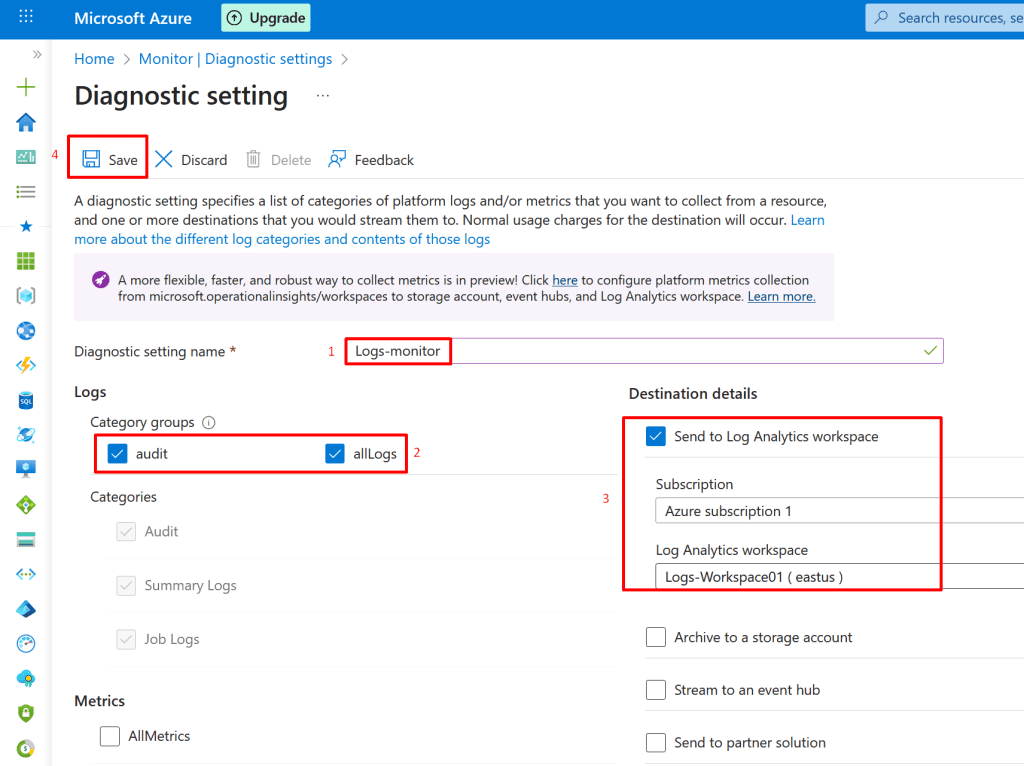
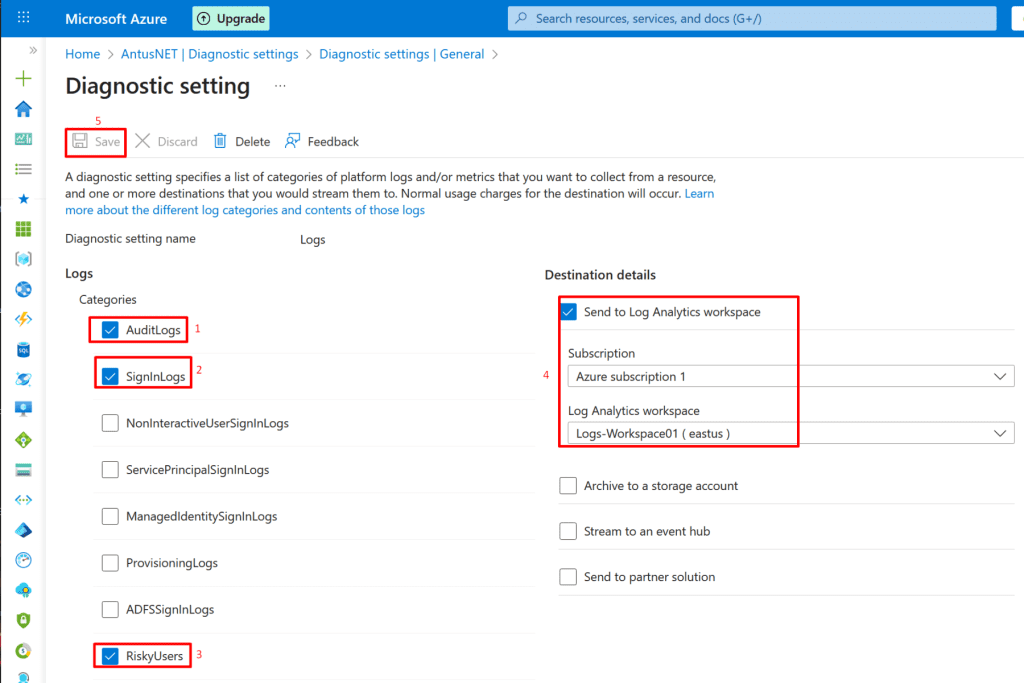
4. Integrating Monitor Logs and Entra ID Azure to Logs Analytics.

5. Verify logs in Log Analytics.

*

Steps

Assign the user a User Administrator role using Privileged Identity Management (PIM).

1. In the search box, type "Privileged Identity Management" and select it.

2. In Privileged Identity Management (PIM), navigate to the Microsoft Entra Roles blade. This section allows you to view, manage, and assign privileged roles, enabling just-in-time access and enforcing least-privilege principles for your users.

3. Select Assign Eligibility to begin configuring which users are eligible for a privileged role. This allows you to define who can activate the role when needed, following the just-in-time access principle.

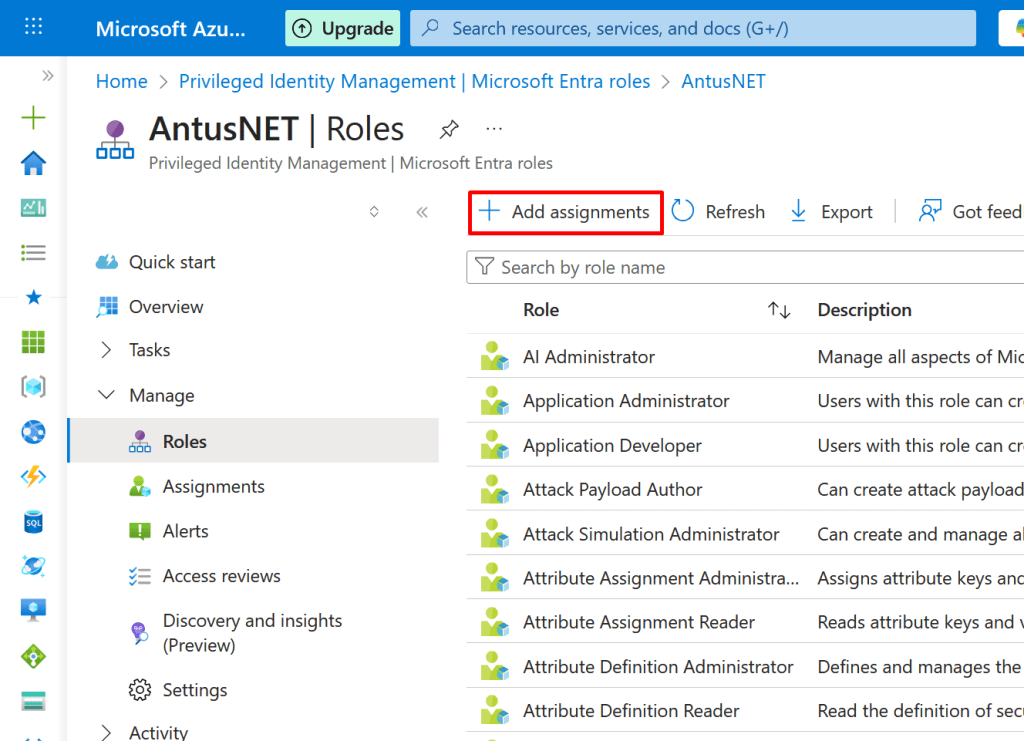
4. Here we can see all the roles available in our environment.

Click Add Assignments to assign the selected user to the User Administrator role.

5. In the Add Assignments blade, choose the role you want to assign and then select the member (user) to receive the role.

  • Select User Administrator role
  • Select the user to assign the role to.
  • Click Select
  • Click Next

Note: The selected user has not been assigned any roles yet.

6. Select Eligible to allow the user to activate the role when needed, rather than having permanent access.

  • Eligible: The user can activate the role when needed through PIM, supporting just-in-time access.
  • Active: This type of assignment is outside of PIM; the user has the role permanently active without requiring activation.

Note:

  • Permanent: The user always has the role active.
  • Eligible (Time-Based): User must activate the role when needed; access is temporary.

Note: Prefer Eligible in PIM to reduce standing privileges and enhance security.

7. In the PIM Assignments blade, you can view all roles currently assigned to the selected user.

8. In the PIM Assignments blade, click on Settings to configure role activation and management options.

9. In the Settings section, click the User Administrator role to configure its settings.

10. In the Role settings details, click Edit to modify the configuration.

11. In the Edit Role Settings page, keep the default settings and check Require approval to activate to ensure activation requires manager approval.

  • Select the approver
  • Click Next: Assignment

Note: Activation Maximum Duration (hours): The maximum time a user can keep an activated role before it automatically expires. It limits how long elevated access is granted for security purposes.

12. On the Assignments page, set the duration for which a user will remain eligible to activate the role, then click Next: Notification. (In this demo we will use default)

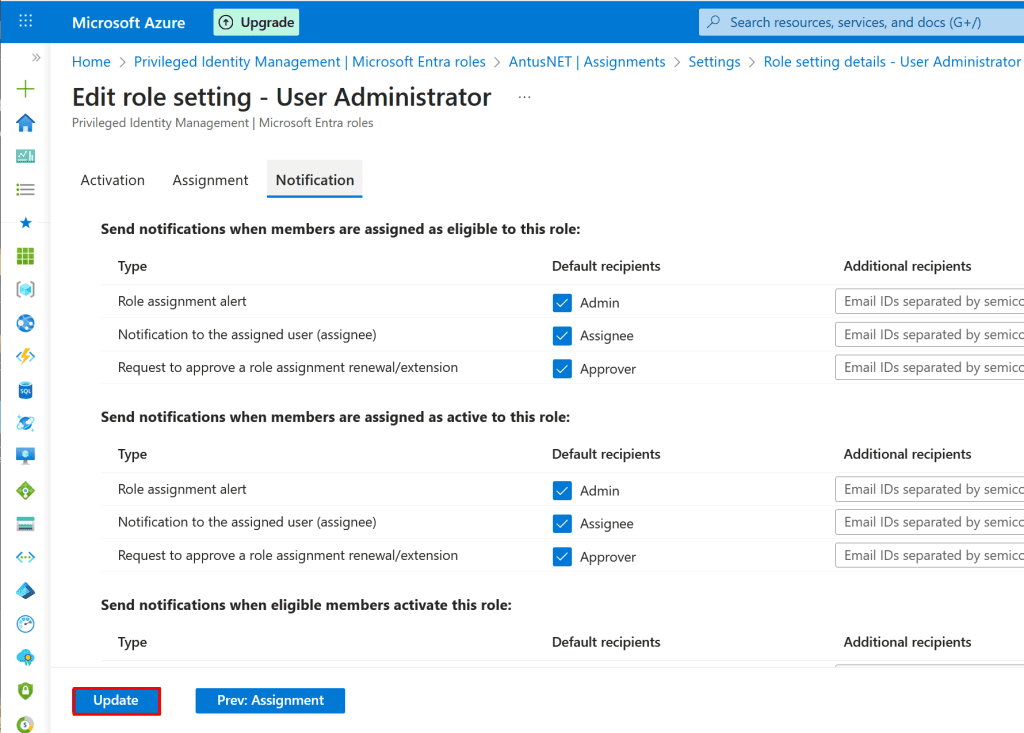
13. On the Notifications blade, keep the default settings and click Update

Note: Notifications Blade (PIM): Displays and configures alerts related to role activation, approvals, and expirations, helping administrators stay informed about privileged access events.

14. Log in as the user to whom you assigned the PIM role. (use private window)

  • In the search bar enter PIM
  • Select PIM

15. Go to My Roles to activate the assigned User Administrator role.

16. Click Activate to enable the assigned role and gain the associated permissions.

17. Provide a reason for role activation, then click Activate in the Activate page.

18. As you can see, the role activation now requires approval because this option was enabled during the PIM setup.

19. Sign in as the user who configured PIM, then navigate to PIM → Approve requests.


20. Approve or Deny the request for role activation.

Note: You have to enter a reason for approval and then click confirm.


21. Sign in as the assigned user and verify that the User Administrator role is now active and approved.

  • Go to EntraID → Users → Username → Assigned roles

*


Enable PIM Audit Logs

1. In the Microsoft Entra admin center, go to:

  • Identity Governance → Privileged Identity Management → Audit history


2. Here you can view all PIM-related events, such as:

  • Role activations and expirations
  • Approvals or denials
  • Assignment changes

You can filter by activity type, user, or date to track specific events.

Note: PIM audit logs are stored for 30 days by default. For long-term retention, export them to Log Analytics.


Create a Log Analytics Workspace

1. Search for Log Analytics workspaces in the top search bar.

  • Click + Create.


2. Configure the workspace:

  • Subscription: Select your subscription.
  • Resource group: Choose an existing one or create a new one.
  • Name: Give it a descriptive name, e.g., PIM-Logs-Workspace.
  • Region: Choose the same region as your Azure AD tenant for best performance.
  • Click Review + create → Create.


Integrating Monitor Logs and Entra ID Azure to Logs analytics

Monitor Logs

Note: Send Azure Monitor activity and resource logs to your Log Analytics workspace to centralize infrastructure monitoring and correlation with Entra ID events.

1. After deployment is complete, go to the resource.


2. You need to send monitoring logs to the Logs Analytics workspace.

  • Go to Microsoft Entra ID → Monitoring → Diagnostic settings.
  • Click + Add diagnostic setting.


3. Name your setting (e.g., Logs-monitor).

Under Category Groups, select:

  • Audit
  • Under Destination, select Send to Log Analytics workspace.
  • Choose the Log Analytics workspace you created in Step 1.
  • Click Save.


Entra ID Logs

1. Note: Send Entra ID AuditLogs and SignInLogs to your Log Analytics workspace to centralize identity monitoring and correlate user activities with Azure resource events.

  • Go to Microsoft Entra ID → Monitoring → Diagnostic settings
  • If no diagnostic setting exists here, click + Add diagnostic setting


2. Under Category details, check:

  • AuditLogs
  •  SignInLogs
  • ProvisioningLogs, RiskyUsers, etc.


Under Destination details, choose:

  • Send to Log Analytics workspace
  • Pick your existing workspace (the one you query from)
  • Click Save

Note: After enabling diagnostic settings for Microsoft Entra ID, it can take up to 60 minutes for AuditLogs and SignInLogs to appear in the Log Analytics workspace.


Verify Logs in Log Analytics

1. Go to Logs-Workspace01 → Logs → change to KQL mode.

Check the AzureDiagnostics table with the following Kusto query:

Copy

AuditLogs
| where TimeGenerated > ago(24h)
| summarize count() by ActivityDisplayName
| order by count_ desc


2. Try to delete/create any user, then query the log via logs.

We can see that the user ‘Hacker.E’ was added on October 5, 2025, at 7:56 PM.

Copy

AuditLogs
| where ActivityDisplayName == "Add user" or ActivityDisplayName == "Create user"
| project TimeGenerated, InitiatedBy, TargetResources, ResultDescription
| order by TimeGenerated desc


3. Review Role Assignments.

We can see that the User Administrator role was assigned to the user ‘Admin’ via PIM on October 5, 2025, at 3:39 P.M.

Copy

AuditLogs
| where TimeGenerated > ago(30d) // adjust time range
| where ActivityDisplayName contains "Add member to role"
or ActivityDisplayName contains "Remove member from role"
| extend TargetUser = tostring(TargetResources[0].userPrincipalName)
| extend RoleName = tostring(TargetResources[0].displayName)
| extend InitiatedByUser = tostring(InitiatedBy.user.userPrincipalName)
| project TimeGenerated, ActivityDisplayName, InitiatedByUser, TargetUser, RoleName, ResultDescription
| order by TimeGenerated desc


Note: Monitoring Azure role assignments is critical for security. It helps detect unauthorized or malicious privilege escalation, ensures compliance with audit requirements, supports incident investigations, and enforces the principle of least privilege by confirming users only have the access they need.


Conclusion
In this project, we demonstrated how to securely assign the User Administrator role using Privileged Identity Management (PIM) with admin approval and how to centralize audit data by creating a Log Analytics workspace. We also enabled PIM audit logs, integrated Azure Monitor and Entra ID logs, and verified that relevant security events are captured.
By following these steps, organizations can achieve enhanced visibility and control over privileged role assignments, ensure compliance with security policies, and strengthen their overall Azure security posture.

*

Written by Kirill.A - Azure & Cybersecurity Consultant at AntusNet

➤ Want more? Browse all our Azure implementation guides.

Need help implementing secure Azure solutions?

Contact us for a free consultation.

    error: Content is protected !!