Deploy a Virtual Machine, Load Balancer, Batch Account, Azure DNS Zone, and Static Web App using an Azure Resource Manager (ARM) template.

Task Details
1. Deploy a Windows VM, NIC, Storage account, Public IP, NSG, VNet Using an ARM (Azure Resource Manager) Template.
2. Deploy an Internal Load Balancer for VMs Using an ARM Template.
3. Create a Batch Account using an ARM template.
4. Create an Azure DNS Zone and Record using an ARM Template.
5. Deploy an Azure Static Web App using an ARM template
*
Steps
Deploy a Windows VM, NIC, Storage account, Public IP, NSG, VNet Using an ARM.
1. Deploy the following Azure resources using an ARM (Azure Resource Manager) template:
- Windows Virtual Machine (VM)
- Network Interface (NIC)
- Storage Account
- Public IP Address
- Network Security Group (NSG)
- Virtual Network (VNet)
*
Inspect the ARM template.
1. Create and save a .json file containing the ARM template code using Visual Studio Code.

--SNIP--
*
Understanding the ARM Template.
This ARM template will automatically create the following resources in Azure:
1. Storage Account
- Name: Auto-generated as bootdiags
(based on the resource group ID). - Type: Microsoft.Storage/storageAccounts
- Purpose: Stores boot diagnostics for the VM.
2. Public IP
- Name: Default is myPublicIP (can be overridden via publicIpName parameter).
- Type: Microsoft.Network/publicIPAddresses
- Purpose: Provides a public IP for the VM so it can be accessed remotely.
- DNS Label: Auto-generated from dnsLabelPrefix parameter (based on VM name + unique string).
3. Network Security Group (NSG)
- Name: default-NSG
- Type: Microsoft.Network/networkSecurityGroups
- Purpose: Security rules for the VM’s network interface.
- Rules: Allows RDP (TCP port 3389) from any source.
4. Virtual Network (VNet)
- Name: Vnet01
- Type: Microsoft.Network/virtualNetworks
- Address Space: 10.0.0.0/16
- Subnet:
- Name: Subnet1
- Address Prefix: 10.0.0.0/24
- NSG: Attached default-NSG
5. Network Interface (NIC)
- Name: myVMNic
- Type: Microsoft.Network/networkInterfaces
- Purpose: Connects VM to VNet and Public IP.
6. Virtual Machine (VM)
- Name: simple-vm (default, can override via vmName parameter)
- Type: Microsoft.Compute/virtualMachines
- OS: Windows (SKU based on OSVersion parameter, default 2022-datacenter-azure-edition-core)
- VM Size: standard_b2s (default)
- OS Disk: Managed, StandardSSD_LRS
- Data Disk: 1023 GB empty disk
- NIC: myVMNic
- Boot Diagnostics: Enabled, using the storage account
7. Output
Hostname: The fully qualified domain name (FQDN) of the public IP assigned to the VM.
In short: This template creates one VM with a NIC, NSG, public IP, subnet, VNet, and storage account for boot diagnostics.
*
Deploy the ARM template.
1. In the Azure Portal, open Cloud Shell by clicking the Cloud Shell icon.
- When prompted, choose Bash.
In the setup box, enter the following:
- No storage account required
- Subscription: Select your resource group
- Click Apply.

*
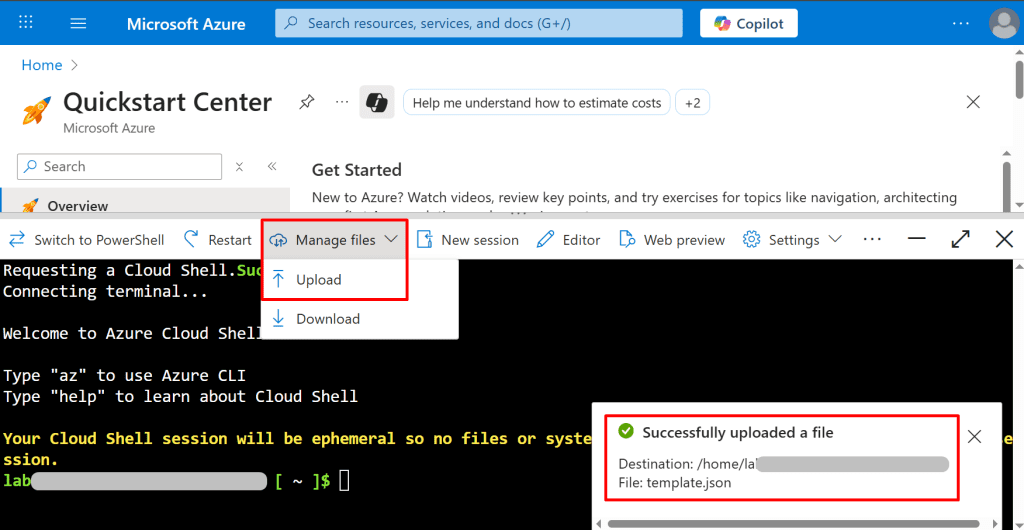
2. In the Cloud Shell toolbar, click Manage files, then select Upload, and upload the template.json file to the Cloud Shell home directory.
*
3. Now deploy the resources using the given command. This step may take a few minutes in order for the resources to get deployed successfully.
Copy command: az deployment group create --name
Note: Copy this command to a text editor and replace the placeholders:

*
Verify your deployments.

*
Conclusion
By following this guide, you have successfully deployed an Azure Virtual Machine using an ARM template. The deployment automatically created all necessary supporting resources, including:
- Storage Account for boot diagnostics
- Virtual Network and Subnet for network connectivity
- Network Security Group with RDP access
- Public IP Address for external access
- Network Interface connected to the VM
This approach ensures repeatable, consistent, and automated deployments, reduces manual configuration errors, and allows you to quickly provision additional VMs or environments by reusing and modifying the template.
You can now access the VM using the public IP or DNS name provided in the outputs and extend the template further for additional resources as needed.