
Configure MFA with Conditional Access, bypass settings, enable SSPR and Identity Protection, and optionally create groups with role assignments and P2 license assignment..

Task Details
Configure MFA with Conditional Access, bypass settings, enable SSPR and Identity Protection, and optionally create groups with role assignments and P2 license assignment.
1. Configure MFA (Multi-Factor Authentication).
2. Create a Conditional Access policy for MFA.
3. Bypass MFA.
4. Self-Service Password Reset (SSPR).
5. Identity Protection.
Bonus: Create a group, add users to the group, and assign a role to the group members..
Bonus: How to Assign a P2 License to a User.
*
Steps
1. Disable security defaults.
Note: New Azure tenants have Security Defaults enabled, which enforce MFA and block legacy authentication. Organizations often disable Security Defaults and use Conditional Access instead, since it provides more granular control (e.g., enforce MFA only in certain conditions, exclude service accounts, meet compliance).

*
2. To enable MFA for users, navigate to Entra ID → Users → All Users then click Per-user MFA.

*
3. By default, MFA is disabled for all users. Select the user for whom you want to enable MFA, then click 'Enable MFA.
Note: After you enable MFA, the user will be required to go through the MFA setup wizard before their next sign-in.
Note: If you select 'Enforce MFA,' the user will be required to complete MFA every time, regardless of other settings.

*
Conclusion
Configuring MFA adds an essential layer of security by requiring users to verify their identity through multiple methods. By enabling MFA through Conditional Access policies, organizations can greatly reduce the risk of unauthorized access while maintaining a smooth sign-in experience for trusted users.
Create a Conditional Access policy for MFA
Note: See the Bonus section for instructions on creating a group, adding users, and assigning roles to group members.
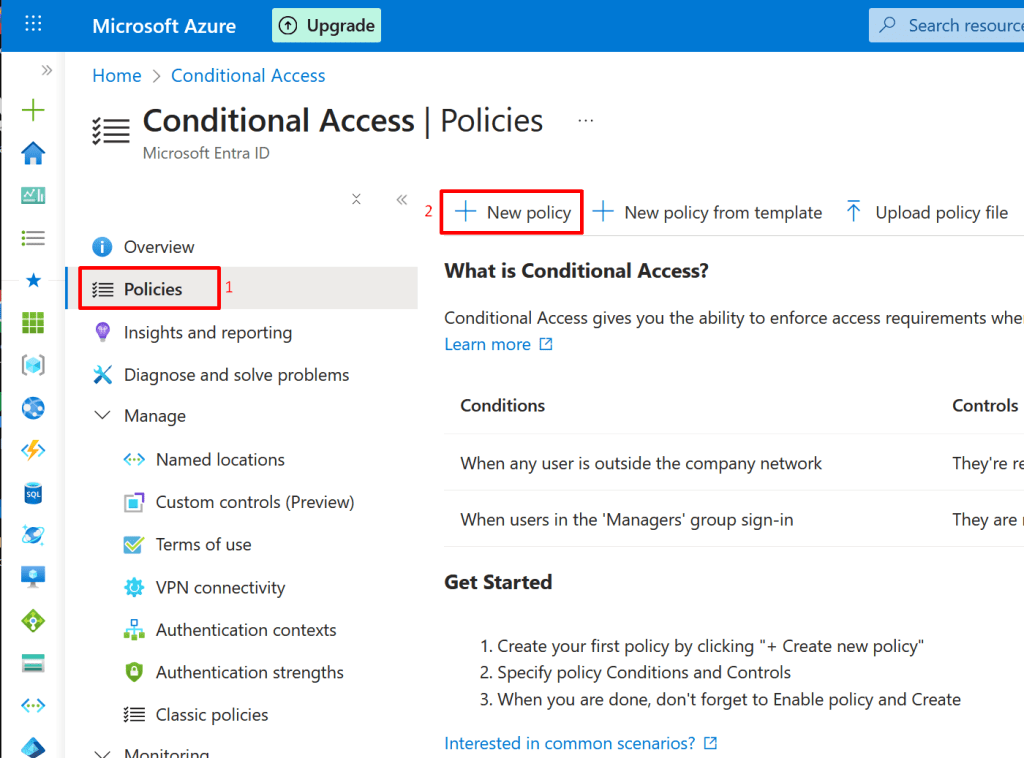
1. Go to Microsoft Entra → Conditional Access by typing it in the search bar. Select it, then click Policies.

*
2. Click New policy
*
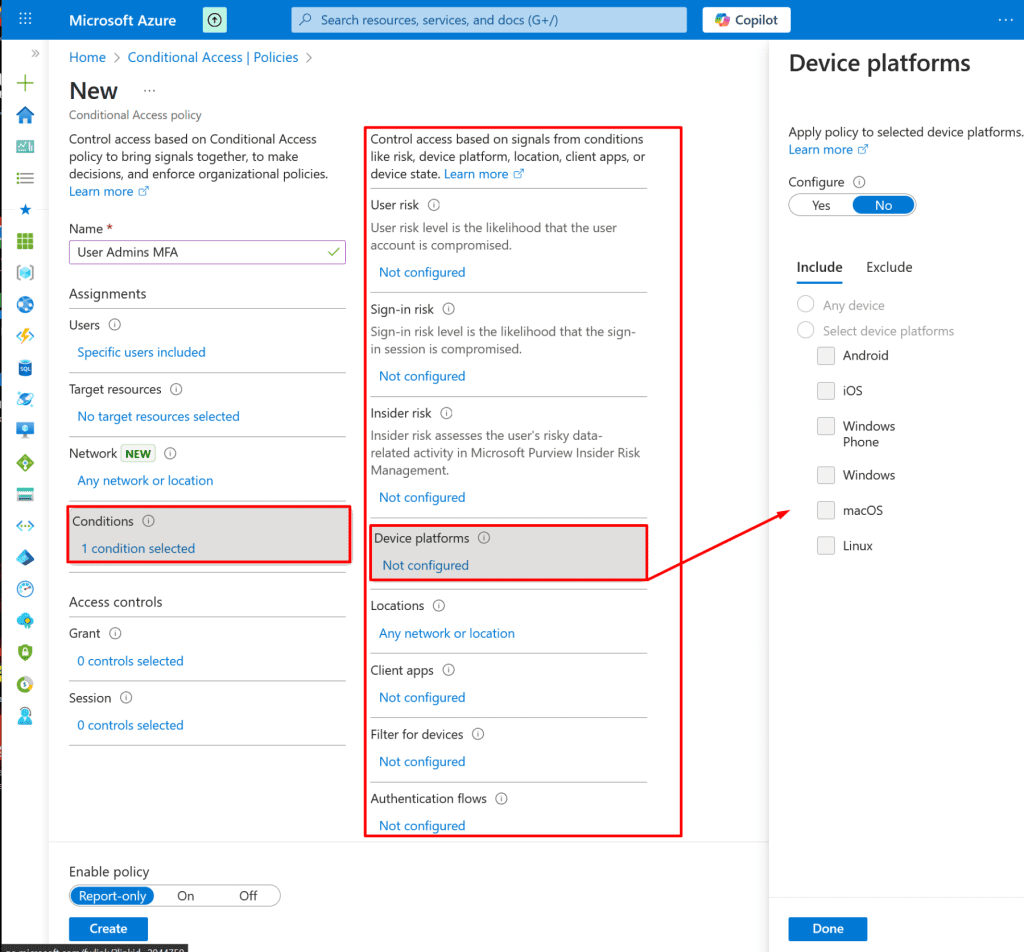
3. Give the policy a name, then assign it to the group containing the admin users.
Note: You can also assign the policy to individual users, however, assigning it to a group is recommended to reduce management effort.

*
4. By configuring conditions, you ensure that the policy only triggers for the specific scenarios you intend to protect, such as "a user with high sign-in risk" or "any sign-in coming from outside the corporate network on a mobile device.
*
5. In the Grant section, you can choose whether to grant or block access based on the conditions you specified. In this demo, we will grant access and require MFA for the User Admins group.

*
6. In the Enable Policy section, turn the policy On.

*
7. Try signing in as any member of the User Admins group to verify that the Conditional Access policy for MFA works as expected.


*
8. As you can see, it requires additional steps to sign in.


*
9. You will need to install the Microsoft Authenticator app on your phone, scan the QR code, and follow the wizard to complete MFA setup.

Note: Many of the legacy MFA options are no longer available in the Azure portal. Microsoft has deprecated per-user MFA management and moved MFA enforcement to Conditional Access policies and Security defaults in Entra ID.
- Use Security defaults for simple, tenant-wide MFA.
- Use Conditional Access for flexible and granular MFA control (requires Entra ID P1/P2).
Conclusion
Creating a Conditional Access policy for MFA ensures that strong authentication is applied based on risk, user group, or location. This approach provides more flexibility and control than enabling MFA per user, making it easier to balance security with user productivity.


