Loading...

Azure Quick Links

v

Azure Cloud Projects

Public Load Balancer

Creating a Secure Standard Public Load Balancer in Azure to Distribute Incoming Network Traffic Across Multiple Virtual Machines.

Task Details

1. Create a Virtual Network
Define the private network space where all your resources will communicate securely.

2. Create Virtual Machines in an Availability Set
Ensure fault tolerance by distributing VMs across multiple fault and update domains.

3. Enable Azure Bastion for Secure RDP Access
Connect to your VMs securely via the Azure portal without exposing public IP addresses.

4. Secure the Environment with NSG Rules
Use Network Security Groups to allow only required traffic and block unauthorized access.

Bonus (Optional): Create an NSG for the Subnet and Use ASG-Based Rules

5. Install IIS on Both Virtual Machines with the PowerShell command
Set up the web server role to host your application or test pages.

Bonus: Automate the installation of IIS on all VMs already deployed in the East US region using a PowerShell script.

6. Create a Load Balancer
Distribute incoming traffic evenly across the VMs to ensure high availability and scalability.

7. Test the Load Balancer
Access the frontend IP to verify that traffic is correctly routed to the backend VMs.

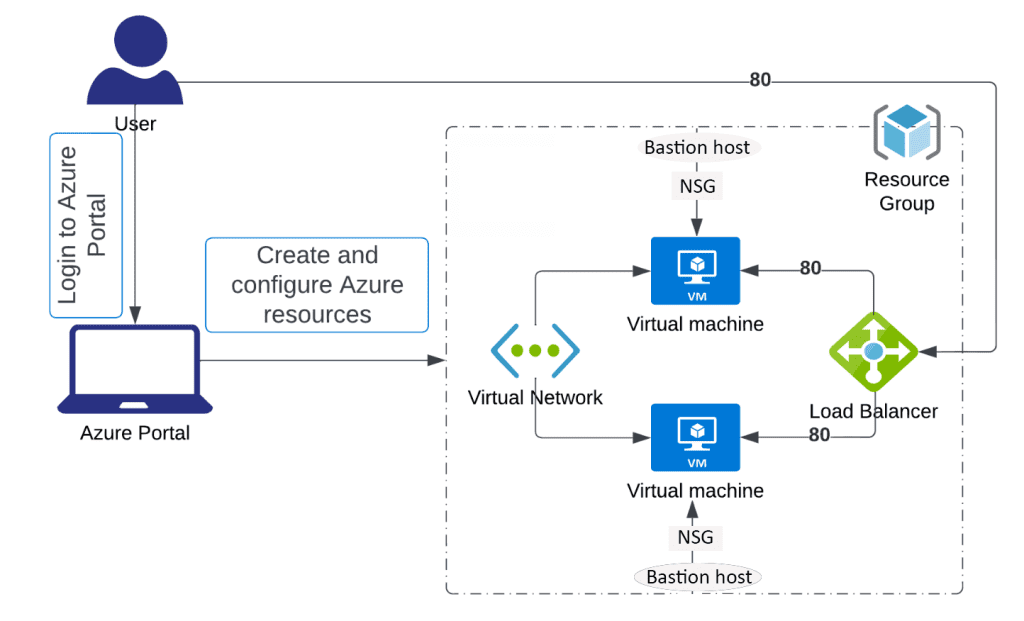
Architecture diagram

*

Steps

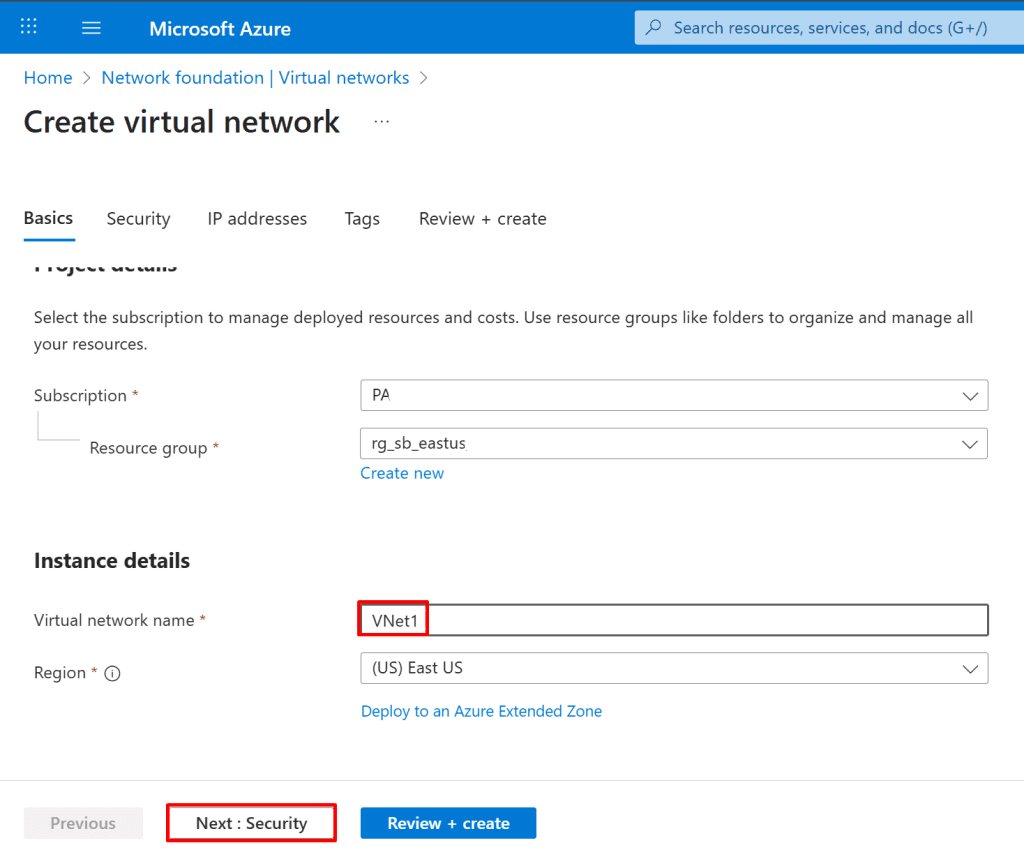
1. Create a virtual network named Vnet1. Within it, define two subnets: one designated for the backend pool and the other for Azure Bastion access.

  • In the Azure portal's search bar, type "Virtual networks".
  • From the search results under "Services," click "Virtual networks."
  • On the Virtual networks page, click the "+ Create" button.

Project details:

  • Select your "Subscription" (e.g., PA).
  • Choose an existing "Resource group" (e.g., rg_sb_eastus) or click "Create new".

Instance details:

  • Enter a "Virtual network name" (e.g., VNet1).
  • Select a "Region" (e.g., "(US) East US").

*

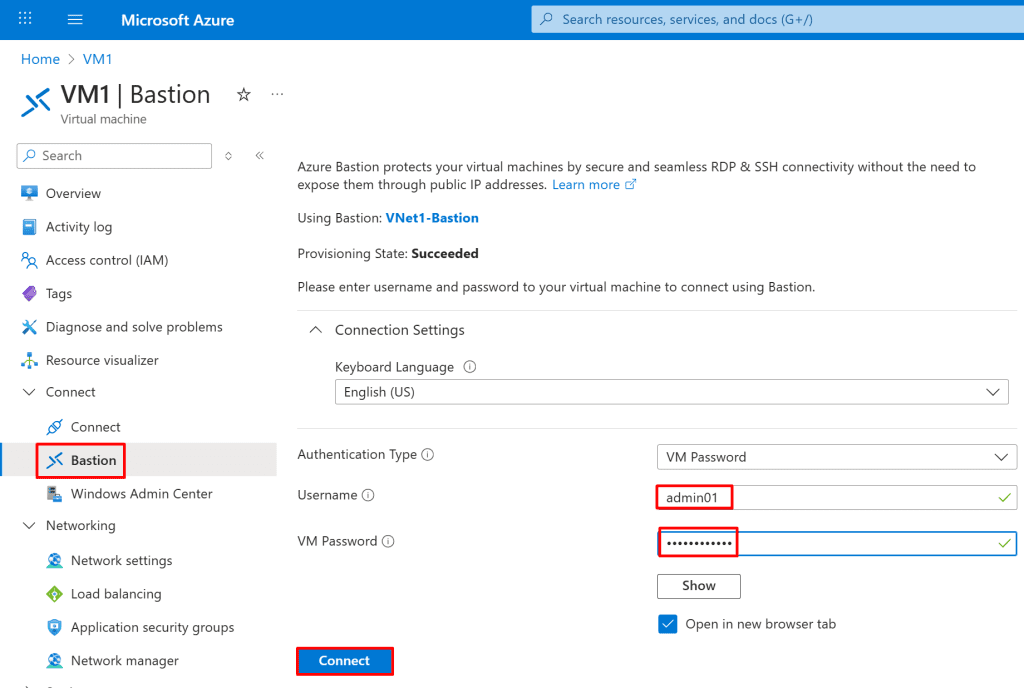
2. In the Security tab, enable Azure Bastion and provide a name for the Bastion host. A public IP address will be assigned automatically by default.

Note: You can also choose to create and assign your own public IP address if needed.
Note: The AzureBastionSubnet will be created automatically when you enable Azure Bastion.

Note: You can connect to a VM through Azure Bastion using either the az network bastion rdp command or a native RDP client (mstsc.exe). The CLI command works without needing mstsc.exe, while using mstsc.exe requires Bastion Standard SKU with Native Client Support enabled. All connections remain secure over the VM’s private IP, so no public IP is required.

*

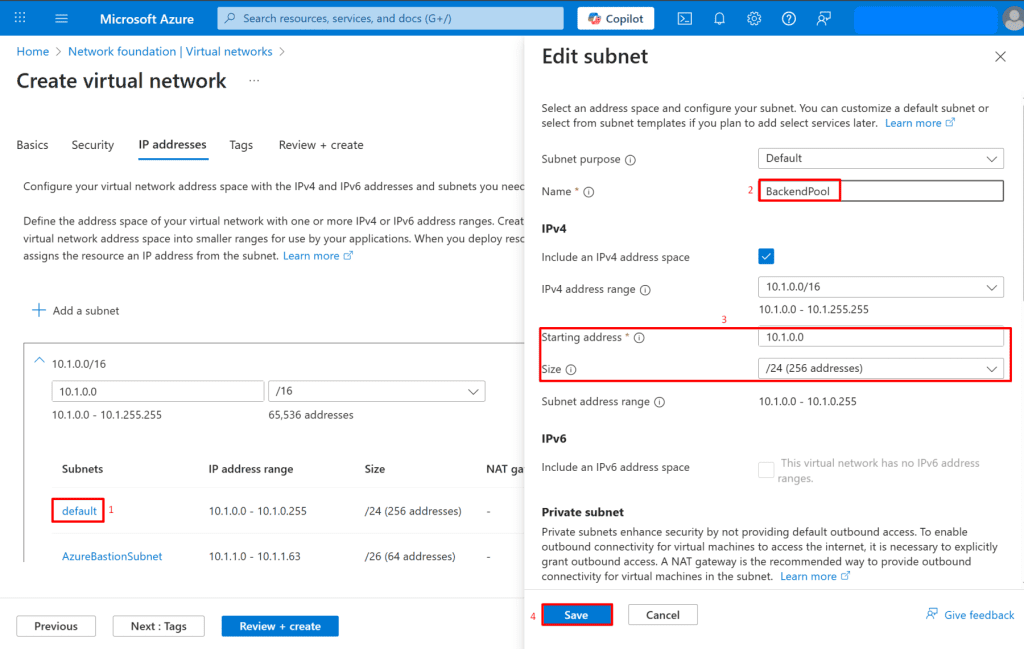
3. Navigate to the IP addresses section and create a new subnet named BackendPool for use with the backend pool of your Load Balancer.

Click on the subnet you wish to edit (e.g., "default"). This will open the "Edit subnet" pane.

Configure Subnet:

  • Name: Enter the subnet name (e.g., BackendPool).
  • Starting address: Enter the starting IP address for the subnet (e.g., 10.1.0.0).
  • Size: Select the subnet size (e.g., /24 (256 addresses)).
  • Save: Click the "Save" button to apply changes to the subnet.

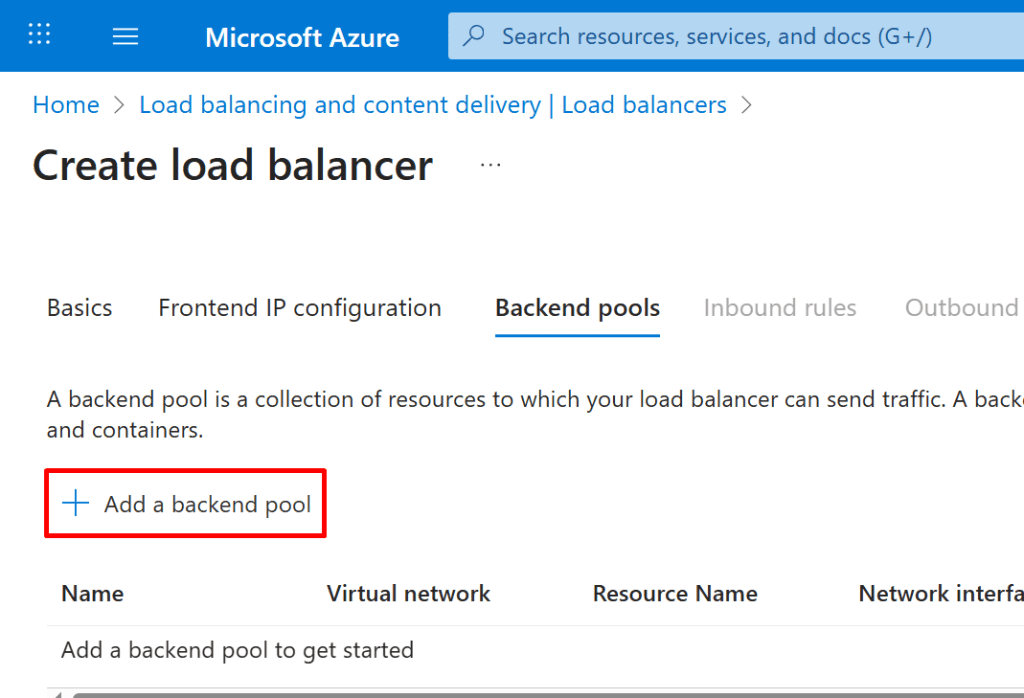
Note: A backend pool is a group of virtual machines (VMs) or other resources that receive traffic from a load balancer.

*

4. Create two Virtual Machines.

*

5. On the Basics tab, configure the following:

Resource Group

  • Select: Your resource group

Instance Details:

  • Virtual Machine Name: VM1
  • Region: East US
  • Availability Options: Select Availability set

Availability Set:

  • Click Create new
  • Name: AvailabilitySet
  • Fault Domains: 2
  • Update Domains: 2

Image:

  • Select: Windows Server 2019 Datacenter - Gen2

Azure Spot Instance

  • Run with Azure Spot discount: Leave unchecked (default)

Size

  • Select: Standard_B2s

Administrator Account

  • Username: admin01
  • Password: Enter a secure password
  • Confirm Password: Re-enter the same password
  • Inbound Port Rules
    Public Inbound Ports: Select Allow selected ports
  • Select Inbound Ports: HTTP (80,) RDP (3389)

Note: Using a load balancer with an availability set ensures high availability by distributing VMs across fault and update domains, while using it with standalone VMs offers load distribution but no fault tolerance.

Note:
In this guide, we use an Availability Set to ensure high availability of virtual machines within a single region by distributing them across fault and update domains.

Alternatively, you can use a Virtual Machine Scale Set (VMSS), which provides similar high availability features but also supports automatic scaling and centralized management of a large number of identical VMs.

VMSS is ideal for scenarios requiring elasticity, such as web frontends or stateless applications. If your workload requires dynamic scaling or zone redundancy, consider using VMSS instead of an Availability Set.

*

6. Navigate to the Disks tab and select the appropriate disk type.

*

7. On networking tab

Network Interface Configuration

  • Virtual Network: Select VNet1
  • Subnet: Select BackendPool
  • Public IP: Select None
  • Name: Leave the default
  • SKU: Select Standard
  • Assignment: Select Static

Click OK

*

8. Follow steps 4 to 7 and create another virtual machine and name it VM2

Note: On the Basics tab, under Availability options, select the previously created Availability Set (AvailabilitySet)

*

9. Create a Load Balancer

  • On the Load balancers page, click + Create.

In the Basics tab, enter or select the following:

Resource Group Select: Your resource group

Instance Details

  • Name: LoadBalancer
  • Region: East US
  • SKU: Standard
  • Type: Public
  • Tier: Leave as default: Regional

Note: Basic Load Balancer is being retired on September 30, 2025. If you are currently using it, Microsoft strongly recommends upgrading to Standard Load Balancer.

Note: Azure Basic Load Balancer supports up to 300 instances (VMs or VM scale set instances) in its backend pool.

*

10. Click on Next: Frontend IP configuration, then select + Add a frontend IP configuration.

Note: The Frontend IP Configuration is the public or private IP address and port that the Load Balancer listens on for incoming traffic.

On the Add IP configuration page, enter or select the following:

  • Name: Enter myFrontend
  • IP version: Leave the default IPv4

Public IP address: Click Create new

  • Name: Enter LB-PublicIP
  • Assignment: Static

Click save and next: Backend pools

*

11. On the Backend pools page, click + Add a backend pool.

 12. On the Add backend pool page, click + Add and select the virtual machines created earlier.

*

13. On the Add IP Configurations to Backend Pool page, select the virtual machines and click Add and then save.

*

14. Configure Load Balancing Rule

Click on Next: Inbound rules.

Under the Load balancing rules section, click + Add load balancing rule.

Select the following details:

  • Name: LoadBalancerRule
  • IP version: IPv4
  • Frontend IP address: Select Frontend
  • Backend pool: Select BackendPool
  • Protocol: TCP
  • Port: 80
  • Backend port: 80

Health probe: Click Create new and configure:

  • Name: HealthProbe
  • Protocol: TCP
  • Port: 80
  • Interval: 5 seconds

Click Review + Create

Note: If session persistence is enabled, a client's subsequent requests will always go to the same backend server.

Note: An inbound rule is required on the Load Balancer to allow incoming traffic and forward it to backend resources. Without it, the Load Balancer will not accept or route any traffic, even if the backend pool and health probes are configured.

Note: You can create up to 100 load balancing rules.

*

15. On VM1, delete the existing NSG RDP rule and create a new one that:

Allows RDP (port 3389) only from within the Azure Virtual Network (source: VirtualNetwork service tag).

  • On your Virtual Machine (e.g., VM1) blade, click "Network settings" under "Networking."
  • Click "Add inbound security rule" (located on the right pane).

Configure Rule:

  • Source: Select "Service Tag".
  • Source Service tag: Select "Virtual network".
  • Destination: Select "IP Addresses".
  • Destination IP addresses/CIDR ranges: Enter the private IP address of your VM (e.g., 10.1.0.4).
  • Service: Select "RDP".
  • Priority: Enter a priority (e.g., 100).
  • Name: Enter a name for the rule (e.g., Allow_RDP_via_Bastion).

Add Rule: Click the "Add" button to create the rule.

Note: This ensures that RDP access to VM1 is allowed only from within the Azure virtual network, effectively requiring users to connect through Azure Bastion (which uses a private IP inside the VNet) instead of exposing RDP publicly.

Note: Access is restricted to the VM’s private IP address only (10.1.0.4)

*

16. On VM1, delete an existent HTTP rule and add a second NSG inbound rule that allows the Azure Load Balancer to send HTTP (port 80) and HTTPS (port 443) traffic to the VM.

  • On your Virtual Machine's (VM1) blade, click "Network settings" under "Networking."
  • Click "Add inbound security rule" (on the right pane).

Configure Rule:

  • Source: Select "Service Tag".
  • Source service tag: Choose "AzureLoadBalancer".
  • Destination port ranges: Enter "80, 443".
  • Priority: Set a priority (e.g., 110).
  • Name: Give the rule a descriptive name(e.g., Allow_LoadBalancer_HTTP_Inbound).

Add Rule: Click the "Add" button to create the rule.

*

17. On VM1, create a "Web App Public Access" third NSG rule that allows inbound traffic on ports 80 and 443 from the Internet (as the source), but restrict the destination IP to the VM’s private IP.(BackendPool subnet only)

  • On your Virtual Machine's (VM1) blade, click "Network settings" under "Networking."
  • Click "Add inbound security rule" (on the right pane).

Configure Rule:

  • Source: Select "Service Tag".
  • Source service tag: Choose "Internet".
  • Destination: Select "IP Addresses".
  • Destination IP addresses/CIDR ranges: Enter the BackendPool subnet range (e.g., 10.1.0.0/24).
  • Destination port ranges: Enter 80, 443.
  • Protocol: Select "TCP".
  • Action: Select "Allow".
  • Priority: Enter "120"
  • Name: Give the rule a descriptive name (e.g., Allow_public_access_from_internet).

Add Rule: Click the "Add" button to create the rule.

Note: This ensures that only traffic from the Internet targeting the VM’s specific IP range (i.e., the BackendPool subnet) through the Load Balancer is allowed, providing public access while limiting exposure.

*

18. Repeat steps 14 to 16 on VM2 to apply the same NSG rules.

Note: You also could add all the VMs to an Application Security Group (ASG) and apply the three NSG rules to the ASG instead of configuring them individually on each VM.

Bonus (Optional): Create an Application Security Group (ASG) and assign two VMs to it by associating their network interfaces.

Step 1: Create the ASG

  1. Go to the Azure Portal.

  2. Search for and select “Application Security Groups.”

  3. Click “+ Create.”

  4. Fill in the details:

    • Subscription: Choose your subscription.

    • Resource Group: Select the same one your VMs are in.

    • Name: ASG1

    • Region: Must match the region of your VMs.

  5. Click “Review + Create”, then “Create.”


*

Step 2: Associate VMs with the ASG

For each VM:

  1. In the Azure Portal, go to each Virtual Machine you want to associate.
  2. In the left menu, under Networking, click Application security groups.
  3. Click + Add application security groups.
  4. Select the ASG you created (e.g., ASG1) from the list.
  5. Click Add to associate the ASG with the VM’s network interface.

🔁 Repeat for VM2.

*

Step 3: Create NSG and associate it with the BackendPool subnet

  • In the Azure portal's search bar, type "nsg".
  • From the search results under "Services," click "Network security groups."

Fill in the "Basics" tab:

  • Select your "Subscription".
  • Choose an existing "Resource group" or "Create new".
  • Enter a "Name" for the NSG (e.g., NSG_BackendSN).
  • Select a "Region" (e.g., "East US").
  • Review + create: Click the "Review + create" button.

Note: You don’t need separate NSGs for each VM; instead, create a shared NSG for the subnet and use Application Security Groups (ASGs) in the rules to target only the appropriate VMs. This reduces duplication and makes your security setup easier to manage.

  • In your NSG (e.g., NSG_BackendSN), click "Subnets" under "Settings" in the left-hand menu.
  • Click the "+ Associate" button.
  • Choose the "Virtual network" that contains your subnet (e.g., VNET1 (rg_sb_eastus)).
  • Choose the "Subnet" you want to associate (e.g., BackendPool).
  • Click the "OK" and then "Save" button (not visible in this crop but typically present) to confirm the association.

*

Step 4: Use the ASG in NSG Rules

Now you can create NSG rules that apply to all VMs in the ASG, instead of configuring them individually.

  1. Go to Network Security Groups.

  2. Select your NSG.

  3. Under “Inbound security rules”, click “+ Add.”

  4. In the rule:

    • Destination: Choose “Application Security Group”

    • Destination ASG: Select ASG1

    • Configure ports, protocols, priority, and name.

  5. Click Add.

Note: Use the same rules configured earlier, but set the destination to 'Application Security Group', then select the previously created ASG1 from the dropdown menu instead of configuring each VM individually.

*

19. Install IIS on Both Virtual Machines

  • Connect to each VM via RDP using Azure Bastion

*

20. Open PowerShell as Administrator.

Run the following command to install IIS:

Copy Command: Install-WindowsFeature -name Web-Server -IncludeManagementTools

*

21. Replace the default HTML file located at C:\inetpub\wwwroot\iisstart.htm with your modified version.

Note: Replacing the default iisstart.htm allows us to uniquely identify each VM by customizing its web page.

Copy Code

*

22. Repeat steps 17 to 19 for VM2 but use the code for VM2:

Copy Code

*

23. Test the Load Balancer

From the left menu, go to Frontend IP Configuration, copy the IP address, and paste it into your browser.

*

24. You will be redirected to one of the two Virtual Machines in the backend pool.
Note: Try performing a hard refresh a few times by pressing CTRL + Shift + R to load content from the other virtual machine or use different browsers.

*

Bonus: Automate the installation of IIS on all VMs already deployed in the East US region using a PowerShell script.

1. Create an iis.ps1 script on your local system, then either upload it to Azure or execute it directly within an Azure PowerShell session.

Copy code

*

2. Run the script by entering ./iis.ps1 in your Azure PowerShell session.


3. IIS is now installed on all VMs in the East US region.

Note: Many bulk installations and configurations, such as the Microsoft Antimalware extension, IIS, SQL Server, .NET Framework, and other VM extensions or software, can be automated efficiently using PowerShell scripts.

*

Conclusion
By following these steps, you've successfully built a secure and highly available web application infrastructure in Azure. You created a private network, deployed fault-tolerant virtual machines, enabled secure management access with Azure Bastion, enforced traffic control using NSG rules, and configured IIS as a web server. Finally, by placing the VMs behind an Azure Load Balancer, you ensured both scalability and uninterrupted access to your application. This setup not only supports production-level availability but also aligns with Azure best practices for security and performance.

*

Written by Kirill.A - Azure & Cybersecurity Consultant at AntusNet

➤ Want more? Browse all our Azure implementation guides.

Need help implementing secure Azure solutions?

Contact us for a free consultation.

    error: Content is protected !!