
This project guides you through enabling and integrating Microsoft Defender for Cloud with Azure and Microsoft Sentinel, including configuring Just-In-Time (JIT) VM access for enhanced security.

Task Details
This project walks you through the essential steps to enable, configure, and integrate Microsoft Defender for Cloud within your Azure environment. You’ll learn how to activate Defender plans, manage security policies and recommendations, enable advanced protections like Just-In-Time access and malware detection, and connect alerts to Microsoft Sentinel for centralized monitoring and incident response.
1. Enable Microsoft Defender for Cloud plans to get the enhanced security features.
2. Configure email notifications for security alerts.
3. Review and manage Security policies.
4. Manage a Security Recommendation’s Settings in Microsoft Defender for Cloud.
5. Remediate Storage accounts should prevent shared key access.
6. Enable and assign Policy "Microsoft Defender for Servers should be enabled"
7. Enable just-in-time virtual machine access.
8. Configure malware detection.
9. Connect Microsoft Defender for Cloud alerts to Microsoft Sentinel.
10. Simulate a malicious file and query incidents using Kusto Query Language (KQL).
*
Steps
Enable Microsoft Defender for Cloud plans to get the enhanced security features.
1. In the Azure portal, open Microsoft Defender for Cloud.
- Under the Management section, select Environment settings.

*
2. Choose the Azure subscription or workspace you want to protect, in this case, Azure Subscription 1.

*
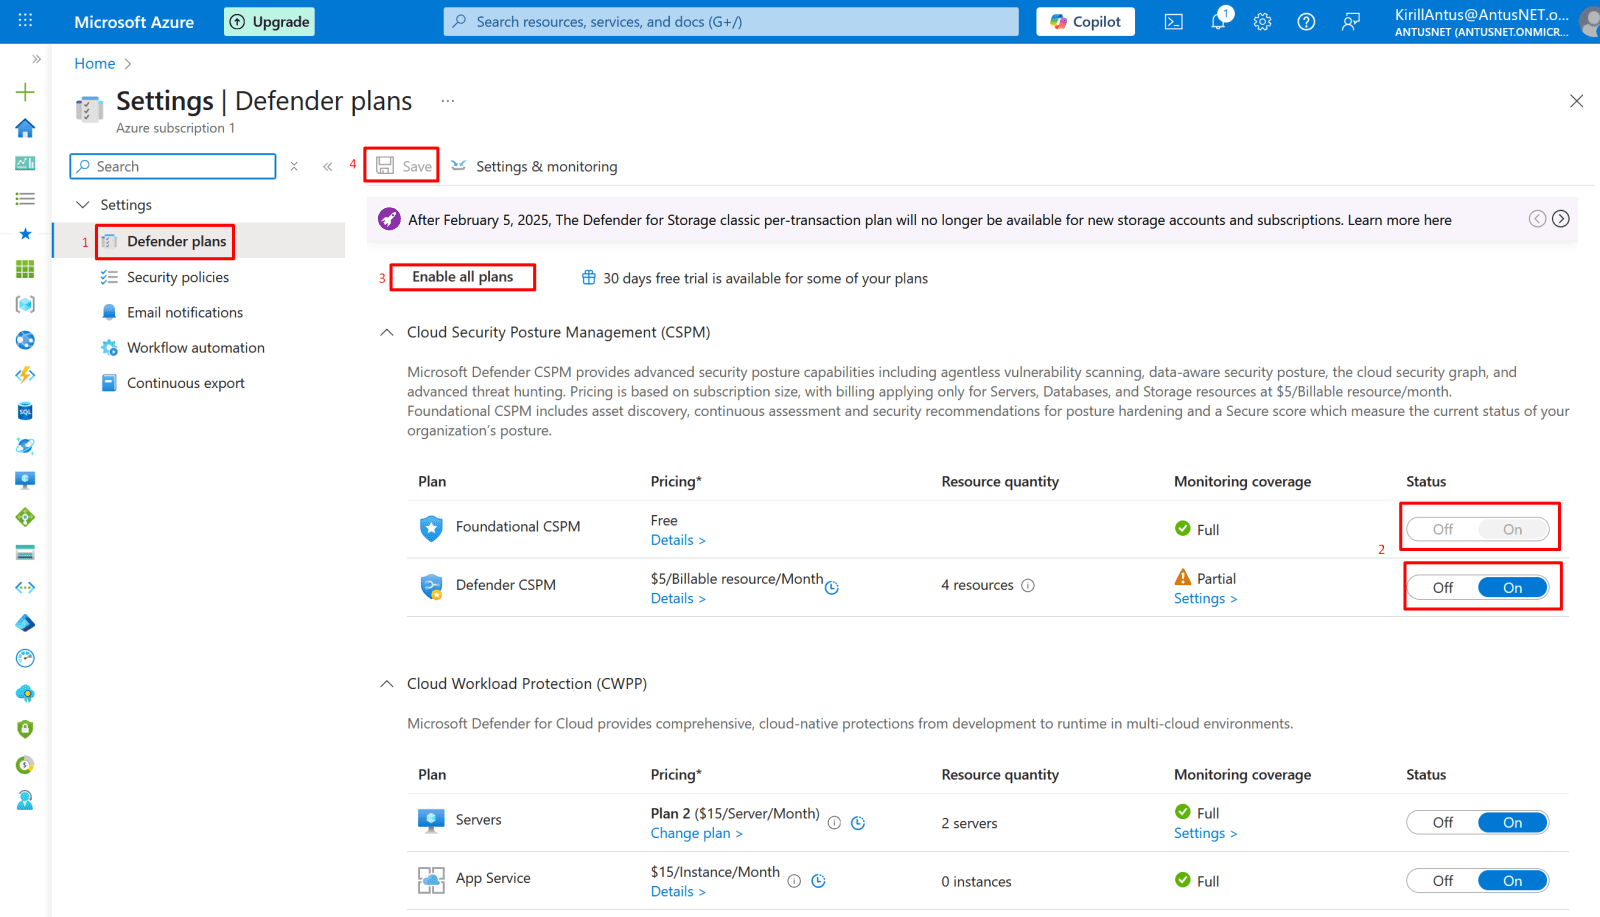
3. You can check monitoring coverage for each Defender plan under Defender plans.
If the coverage shows "Full," all required extensions are installed.
If it shows "Partial," hover over the info icon to see which extensions are missing.
Then select Enable all plans to enable all Microsoft Defender for Cloud plans.
Select Save.
*
Configure email notifications for security alerts.
1. Go to Microsoft Defender for Cloud → Environment settings, then select your subscription.

*
2. Click Email notifications (or Security contacts, if using the new interface).
Choose who should receive alerts:
- Select users from the dropdown list (e.g., Owner).
- Or enter specific email addresses, separated by commas (no limit).
- Click Save to apply the changes.

*
Review and manage Security policies.
1. In Microsoft Defender for Cloud, go to the Management section and select Environment settings.
You’ll see your Azure management groups or subscriptions listed.
Then, select the subscription.

*
2. Click on "Security policies"
This Security policies page in Microsoft Defender for Cloud lets you manage which security standards and compliance frameworks apply to your Azure subscription.
From here, you can:
- Enable or disable security standards (like Microsoft Cloud Security Benchmark, NIST, CIS, or ISO).
- View the number of recommendations each standard provides to improve your security posture.
- Assign frameworks to your subscription to align with organizational or regulatory compliance goals.
Note: The Recommendations blade in Microsoft Defender for Cloud shows specific security improvement actions based on the standards you’ve enabled (like Microsoft Cloud Security Benchmark or NIST).

*
Manage a Security Recommendation’s Settings in Microsoft Defender for Cloud.
1. Go to Defender for Cloud.
Find the recommendation you want to adjust (e.g., “Storage accounts should prevent shared key access”).
Click the recommendation title to open its details.

*
2. On the right panel (Take action), you have these options:
- Remediate → Follow the fix steps (e.g. disable shared key access in Storage settings).
- Assign owner & set due date → Assign responsibility and timeline.
- Exempt → Use this to disable or exclude the recommendation for this resource or scope.
- Click Exempt → choose reason/scope → Save.
- This disables it without affecting your secure score.
- Trigger logic app → Automate response (optional).
- Deny (Prevention) → Enforce the rule for future resources (blocks misconfigurations).
Note: To enable it again, go back to Recommendations → open it → click "Three dots," and then change back to audit.

*
Remediate "Storage accounts should prevent shared key access"
In the remediation process, I referred to the official Microsoft documentation available here.
1. Disable Shared Key authorization.
- Navigate to your storage account in the Azure portal.
- Locate the Configuration setting under Settings.
- Set Allow storage account key access to Disabled.
- Click "Save"
Note: After you disallow Shared Key authorization, making a request to the storage account with Shared Key authorization will fail with error code 403 (Forbidden)

*
2. Verify that Shared Key access is not allowed. with following command
az storage account show --name storage0946 --resource-group NetworkWatcherRG --query "allowSharedKeyAccess"

*
3. For some recommendations, an automated remediation (fix) option will be available.
On the VM page, open the Microsoft Defender for Cloud blade, select View recommendations, and click on the available recommendation to review its details.

*
4. Click "Fix" then choose your resource to fix.


